Project Git 'er done!: Stages 1, 2…now 3.

supraguy@aol

Well-Known Member
Dec 30, 2005
4,238
39
48
Atlanta
Teeny update from Canukistan:
I'm stuck in a hotel room in Vancouver right now, but I did order a few parts:

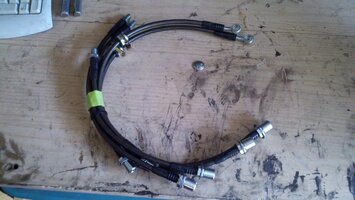
Aaron at Driftmotion will be sending me a new set of brake lines to fit the Cobra brake upgrade- the final
parts that I needed to complete the conversion. I also just ordered new front upper control arms. I think mine aredecent, but the new ones were cheap, so I've decided to replace, rather than deal with old loose joints and 25 yr old boots.

Also, awaiting a shipping quote from Ronnie K. for new front poly subframe bushings, and steering rack bushings.

I am bleeding money at an alarming rate, but at least the suspension stage will be completed soon.
 

supraguy@aol

Well-Known Member
Dec 30, 2005
4,238
39
48
Atlanta
The latest:

I just got back from a week in Canada, and 4 boxes were waiting for me on the front step:
New upper A-arms
New front ball joints
Front brake hardware for the Cobra calipers

Hopefully tomorrow, I will receive 2 boxes from Aaron- a set of stainless brake lines to accomodate the new calipers, and the conversion kit to mount them.
I have indeed ordered a set of poly front subframe, as well as steering rack bushings from Ronnie K.
I expect that they will take a little while to receive. But that's ok- I'm going out of town again in two days on another ungodly-long trip. Pics tomorrow.
 

supraguy@aol

Well-Known Member
Dec 30, 2005
4,238
39
48
Atlanta
Well, just as hoped, Mr. UPS dropped off another box this morning:
Cobra conversion brackets:
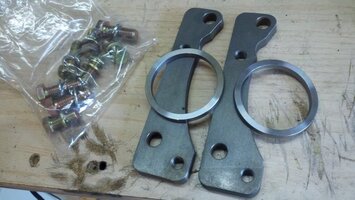
2012-03-30_10-28-31_614.jpg

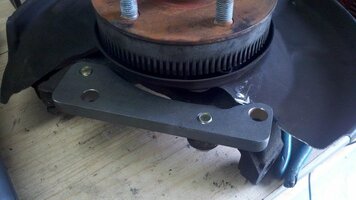
So I got started on the modification of the front hubs. By 'modify', I mean that I cut about 1.5 inches from the top of each dust shield.
Here you can see that cut, plus the bracket being test-fitted:
2012-03-30_11-54-52_859.jpg

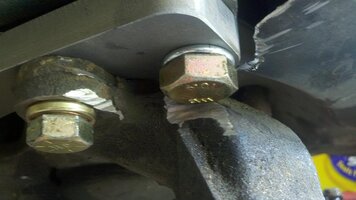
Here's where you have to slightly clearance the upper A-arm mount. It was just a matter of 30 seconds' work with an angle grinder:
2012-03-30_12-09-16_136.jpg

And now it fits.


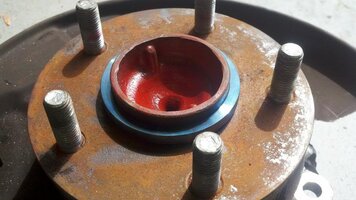
While this was happening, I heated up one of the hubcentric rings that came with the kit. Notice how it 'blued' in the oven.
Its a tight fit at room temp, but I didn't want to bang it on. After heating, it slipped on, easy-peasy. 400 degrees for 30 minutes then add you favorite seasonings:
2012-03-30_12-54-43_786.jpg

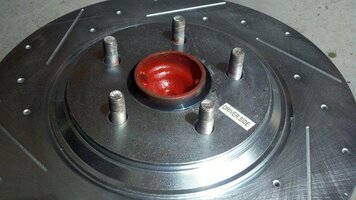
Test fit of the rotors confirms that the new cnc-cut rings that Aaron provides are trouble-free, compared to the horror stories i've heard concerning the aluminum ones:
2012-03-30_12-56-05_681.jpg
So now the only package in transit is the new brake lines. These hubs won't be going on the car for some time yet, as I am waiting for the front subframe +steering rack bushings from Ronnie K. Also, I will be replacing the steering rack at the same time, so I have to go order more stuff.

PS- Took both A-arms and both lower ball joints off today before I started on this. WOW. Both ball joints were loose, but one had over an 1/8th of an inch of up-down freeplay- yikes!. And although the A-arms are in ok shape joint-wise, both boots had small to medium rips in them. My new parts are money well spent.
 
Last edited:

supraguy@aol

Well-Known Member
Dec 30, 2005
4,238
39
48
Atlanta
LOL.
In case anyone is still reading this with even passingly-mild ambivalence, Here's the new brake lines from Driftmotion.
The fronts are slightly longer than stock, so that the oem brake line mounting/ guiding points can be used:

2012-04-02_12-53-01_297.jpg

I am now waiting on the Ronnie K. front bushings, then I can drop the front subframe.
 
Last edited:

lithium14

Member
Jan 7, 2011
995
0
16
Austin
LoL I am very interested. Still. I just went through a front subframe refresh with poly bushings everywhere. Only thing I can think of is to say make sure you break all the bolts loose before dropping the subframe. Doing so afterwards is a huge PITA.
 

supraguy@aol

Well-Known Member
Dec 30, 2005
4,238
39
48
Atlanta
Thanks for your response.
Which bolts are you talking about exactly?
I understand that I'll need to unbolt the steering rack from the column input, and the two motor mounts, and of course the four subframe bolts.
Anything else? all of the suspension is already off the car.

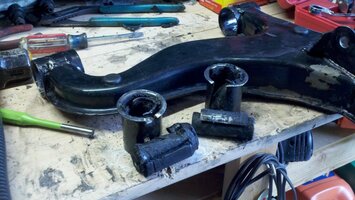
PS- The bushings in the lower front control arms, are a huge PITA. Had to sawzall them out.

2012-04-02_18-08-54_863.jpg
 
Last edited:

supraguy@aol

Well-Known Member
Dec 30, 2005
4,238
39
48
Atlanta
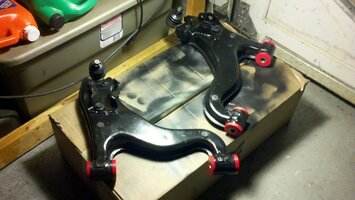
Well, after cutting out the lower control arm bushings, I proceeded to degrease, sand down, and paint the arms.
Then I greased up the new E.S. bushings and installed them, along with the new lower ball joints.

2012-04-02_21-16-22_267.jpg
I still have to install the new bushings into the new upper A arms. I feel bad about it though, because they're brand new bushings, and perfectly firm.
I'm hoping that the bushings will pop out in useable shape.
 
Last edited:

Supra28

Supramanian
Aug 17, 2006
1,921
0
36
Columbus, OH/Kansas
Keep the posts and updates coming! As with MANY other builds, this is another that I am closely following. I follow PAGE BY PAGE, it's all kept track in my notepad. ;)

No doubt an interesting and quality build.
 

lithium14

Member
Jan 7, 2011
995
0
16
Austin
oh, nvm you got them lol. I was referring to the lower control arm bolts. lookin good!!! I can't wait to see how it drives with poly bushings everywhere.
 

supraguy@aol

Well-Known Member
Dec 30, 2005
4,238
39
48
Atlanta
It'll be quite a while before I can give driving impressions on the poly's.
Next stage is interior, and everything's coming out, including the carpet and dash.
 

supraguy@aol

Well-Known Member
Dec 30, 2005
4,238
39
48
Atlanta
Yes, I'm still moving ahead on this project.
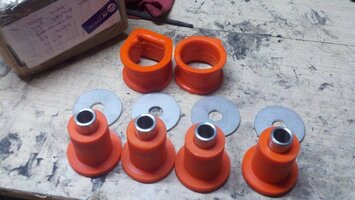
We left off with me waiting on two things: subframe and steering rack bushings. They've arrived.

Ladies and gentlemen, all the way from New Zealand- a big hand for Team Orange!

2012-04-14_01-32-07_178.jpg
This means that i can finally pull the front subframe and swap out the steering rack, detail the subframe, and replace all bushings.
THEN, Stage one of the build will be complete.
:)
 
Last edited:

supraguy@aol

Well-Known Member
Dec 30, 2005
4,238
39
48
Atlanta
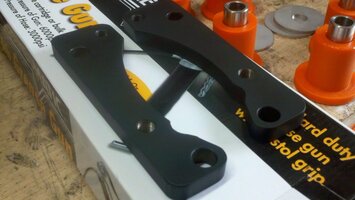
So, Thanks to my buddy John, my caliper conversion brackets are finally powdercoated a nice durable flat black:

2012-04-19_15-59-35_46.jpg
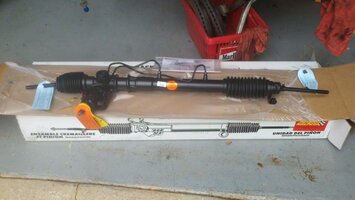
Also, I received my new steering rack today:

2012-04-19_17-51-07_743.jpg

If the weather's good tomorrow, the plan is:

Remove front subframe
clean, repaint and reinstall with new rack & pinion, new rack and subframe bushings
Install upper and lower arms
Install front coilovers.
Install front hubs
Install cobra brake calipers and brake lines

That's alot, though. I guess we'll see.
 
Last edited:

supraguy@aol

Well-Known Member
Dec 30, 2005
4,238
39
48
Atlanta
Well, it's all gotta be done eventually.
rather than do interior next, I've decided to tackle the drivetrain.

Parts I already have:
New factory engine harness
680cc drop-in injectors
T4 log manifold
Cunningham A-beam rods
ARP head studs
New shimmed oil pump
New oil squirter bolts
Aluminum flywheel

Parts I still need to buy:

Late model 7m block/ crank
Wiseco pistons
Precision 6262 turbo
40mm wastegate
AZP oil supply kit
ARP main studs
MHG- Titan or Cometic
cam gears
Spec 2+ clutch
So it looks like the motor will be the priciest part of the build, not surprisingly.
 

IBoughtASupra

New Member
Mar 10, 2009
4,455
0
0
Queens, NY
What 40MM gate are you going with? Just stick a Tial 44MM on there. I have seen boost creep with the 38MM and the 40MM is just a little bit larger. The 44MM is a great size.
 

supraguy@aol

Well-Known Member
Dec 30, 2005
4,238
39
48
Atlanta
Well, I have an HKS-style manifold, so I have to either get a 40 or 50mm square flange wastegate.
So I guess I'll go with the 50.
:)