My rings are all oiled up, so safe there. But this was specifically in relation to turning the crankshaft - even before the rods/pistons were installed, if memory serves.
MickyG's MX-73 to 7M-GE Swap
- Thread starter mickyg
- Start date
You are using an out of date browser. It may not display this or other websites correctly.
You should upgrade or use an alternative browser.
You should upgrade or use an alternative browser.
Yesterday:
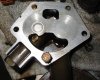
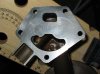
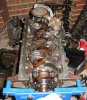
Got the oil pump cleaned up, lapped out some wear marks on pump body and cover, measured clearances (all about middle of the range before lapping), shimmed by about 4mm, and mounted!
Getting very close to finishing off the bottom end. Still need to mount the oil pump delivery pipe, thoroughly clean the sump, and install the oil pump drive shaft (or is it shaft then pump?).
Pics in a few hours...
Yep, getting there! I have to go back and check shim sizes because I couldn't remember if 4mm was OK. I know 10 is what some people have been mentioning and that you'd commented on how close to coil binding that would make things.IJ. said:Almost there Micky!
4's fine!
I ran 4.8mm last time and 6mm this time without an issue.
(the washers I use are 1.2mm thick and a perfect fit in the cap)
I ran 4.8mm last time and 6mm this time without an issue.
(the washers I use are 1.2mm thick and a perfect fit in the cap)
Well, I just did some much needed reading on the sizing (again) and am now being very cautious about this. Actually I'm even thinking about not shimming it at all!
Two reasons really:
There's a simple answer for both of these though.
Two reasons really:
- I have no suitable washers and was instead using a nut that fits just about perfectly in the threaded cap.
- After reading a lot of well informed posts about what oil pressure does and why it's needed, I'm thinking the extra pressure may be unecessary.
There's a simple answer for both of these though.
- Buy appropriate washers (the nut will only contact the spring around the inside of the coil and that will likely deform the spring).
- Going 4mm is likely to be "safe" regardless of whether the extra pressure is really necessary.
Pics
Edit:
Removed pic 1 because I need more pic space.
- pump before cleaning
- pump cover gear wear
- after about 5 mins of lapping with 200 grit wet sandpaper on pane of glass (not finished yet)
- pump after basic engine degreaser cleaning
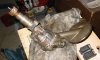
- pump installed in block. I decided to leave the hard pipe off because it doesn't do anything on a non-turbo motor :biglaugh: :evil2:
")
Edit:
Removed pic 1 because I need more pic space.
Attachments
Last edited:
Forgot to mention the biggest reason why I should shim - old pump that likely doesn't flow as well as it would have new, despite clearances being OK.
Being serious
If your pump is even a little suspect I wouldn't use it as it's the heart of a 7M!
If your pump is even a little suspect I wouldn't use it as it's the heart of a 7M!
No, I think my pump is fine.
I was simply being a jerk about the hard line and leaving it off to poke fun at others *aherm* who have been confused by it in the past. All in relation to reading various oil shimming threads!
Also, your pump wouldn't work for me withough cutting and welding the pickup tube to the front sump location. Not that that's likely to be a problem for you!
mickyg said:pump installed in block. I decided to leave the hard pipe off because it doesn't do anything on a non-turbo motor
I was simply being a jerk about the hard line and leaving it off to poke fun at others *aherm* who have been confused by it in the past. All in relation to reading various oil shimming threads!
Also, your pump wouldn't work for me withough cutting and welding the pickup tube to the front sump location. Not that that's likely to be a problem for you!
Progress over last few nights
Picked up some appropriate sized washers on the way home from work and now have 4mm of shimmage on the pump relief. Hard line cleaned up and mounted (very low torque on that pipe to pump bolt!). Pump drive shaft installed.
I'm getting the sump cleaned up and will paint the bottom end and sump over the weekend - especially given the weather's finally warm enough to make this happen!
Today:
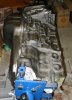
Gave the block and oil pan a nice, fresh coat of paint today. In the end, I decided on "cast iron" engine enamel from VHT. Both because it was readily available (satin black wasn't) and I wanted something different but not flashy. It was a bit difficult to see where I'd painted, as the colour is such a close match to the natural colour of the block. I think I like the results.
Gave the block and oil pan a nice, fresh coat of paint today. In the end, I decided on "cast iron" engine enamel from VHT. Both because it was readily available (satin black wasn't) and I wanted something different but not flashy. It was a bit difficult to see where I'd painted, as the colour is such a close match to the natural colour of the block. I think I like the results.
Attachments
Last edited:
That's either IJ for "it's not satin black" or a genuine compliment! Either way, thanks (I think)!
I managed to accomplish very little yesterday - picked up some sealer for the oil pan and got all excited about putting it on. Unfortunately, when I put the block back on the stand, I was more concerned about balance and ease of rotation. The only way to get the center of rotation lined up properly was to mount the fingers really close to the crank axis. That meant the bolts were so close to the crank that it would be impossible to get the rear main seal retainer on!
So after some pretty inventive methods of moving the fingers out of the way (I'll spare everyone the details - it wasn't the safest thing I've ever done) I managed to get the retainer on, then quickly realised I'd need to grab the gasket first. Then realised it didn't come with the kit!
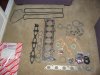
I was so excited to see all the other bits in the kit that I never looked for the rear gasket. Oh well, about $5 from Toyota so can't complain.
Here's the gasket set (just so this post isn't pic-less):
I managed to accomplish very little yesterday - picked up some sealer for the oil pan and got all excited about putting it on. Unfortunately, when I put the block back on the stand, I was more concerned about balance and ease of rotation. The only way to get the center of rotation lined up properly was to mount the fingers really close to the crank axis. That meant the bolts were so close to the crank that it would be impossible to get the rear main seal retainer on!
So after some pretty inventive methods of moving the fingers out of the way (I'll spare everyone the details - it wasn't the safest thing I've ever done) I managed to get the retainer on, then quickly realised I'd need to grab the gasket first. Then realised it didn't come with the kit!
I was so excited to see all the other bits in the kit that I never looked for the rear gasket. Oh well, about $5 from Toyota so can't complain.
Here's the gasket set (just so this post isn't pic-less):