Diff rebuild by "pro" not going well

Piratetip

Far From Maddening Crowds
Staff member
Super Moderator
Dec 30, 2005
1,177
69
48
39
MKE, WI
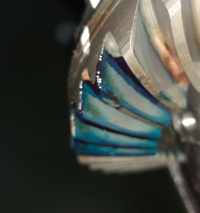
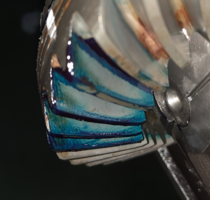
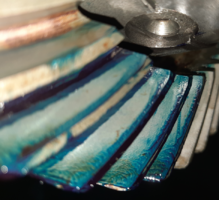
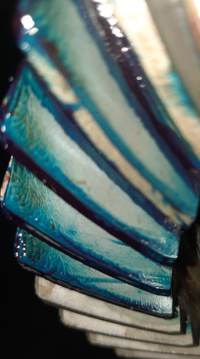
Looks good to me.
I would have went a hair deeper, but as you said you were running out of thinner shims on the carrier side.
If you are not at very high HP levels it won't matter, the pattern you have now is very good.

A job well done, nice pattern.
Hopefully you have now eliminated the diff noise with the new gears.
 
  • Like
Reactions: alcyon

alcyon

Active Member
Jun 15, 2017
176
43
28
Kuala Lumpur
It's supposed to be a good day today, but its not. Its utterly a horrible end to all this work. The diff made a lot of noise, this time far worse than before. It made noise on both accel and decel. Much louder on decel. This time its not a knocking type sound but a grind hum-whine.
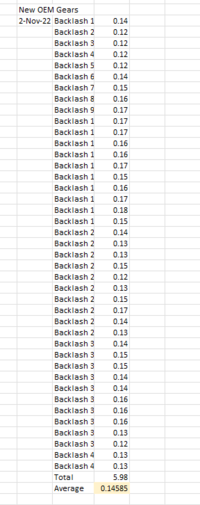
I am stumped, I dont know what else to do, perhaps I need to change all the bearings again. But then again, this set of China made gears aren't confidence inspiring either, having a huge backlash difference between 0.24mm at loosest and 0.06mm at tightest. When I am coasting along very slowly in N, I could hear this cyclical variation, as if It's alternating between tight and loose backlash. It could be the carrier bearing preload is not enough, but the difficulty in knocking in the side shims tell me it must be enough preload. I still think its the diff, as I have not touched any other components this whole time I rebuilt with new 3rd party gears. And as I recall, the old gears were not making noise on accel, only decel.
What elese could it be, did I heat the inner pinion bearing too long ? I did do a test spin with a wrench for about 20 turns as fast as I could in both directions, without oil, and no strange sounds appeared.
I am scheduled to go overseas, so I am gonna leave it be a while, just drive one full tank of gas and break in the gears, and check the oil level after 500km.
 

Piratetip

Far From Maddening Crowds
Staff member
Super Moderator
Dec 30, 2005
1,177
69
48
39
MKE, WI
Wish you were closer.
I would offer to help you out with this.

Don't think it's the gears causing the noise, something is off somewhere.
Without seeing it in my hands I couldn't tell you where the error is.

Your setup and build notes look ok to me, my guess is something is off with the bearings / preload or the procedure it was setup.
Don't think bearings are bad.

A well setup diff makes no noise, notta / zilch.
I've had mine to 130 mph and everywhere in-between, totally dead silent.
Same goes for the others I have built and shipped out.

One exception is the MKIII diffs, they have an inherent resonant frequency they hit around 45-50mph.
Ive been able to mitigate it somewhat with REM polishing on the gears and bearings, but never fully goes away.
Just a design flaw / harmonic it hits.

For the backlash difference have you checked the runout of the LSD center?
( The flat face the gearset bolts to)
Curious what would drive that large of a difference in backlash, unless the gears were not machined properly.
 
  • Like
Reactions: alcyon

alcyon

Active Member
Jun 15, 2017
176
43
28
Kuala Lumpur
Wish you were closer.
I would offer to help you out with this.

Don't think it's the gears causing the noise, something is off somewhere.
Without seeing it in my hands I couldn't tell you where the error is.

Your setup and build notes look ok to me, my guess is something is off with the bearings / preload or the procedure it was setup.
Don't think bearings are bad.

A well setup diff makes no noise, notta / zilch.
I've had mine to 130 mph and everywhere in-between, totally dead silent.
Same goes for the others I have built and shipped out.

One exception is the MKIII diffs, they have an inherent resonant frequency they hit around 45-50mph.
Ive been able to mitigate it somewhat with REM polishing on the gears and bearings, but never fully goes away.
Just a design flaw / harmonic it hits.

For the backlash difference have you checked the runout of the LSD center?
( The flat face the gearset bolts to)
Curious what would drive that large of a difference in backlash, unless the gears were not machined properly.
Thanks Piratetip. I have not checked the open diff carrier center, but I did check the China ring gear runout and it was only 0.03mm maximum, well under the 0.1mm allowed. I still believe it is the ring and pinion based on 4 reasons.
1. The previous rebuild with the old gears had no noise on accel, only decel. I have not altered any other component .
2. The Backlash variation on this new China ring and pinion is just too much, from 0.24mm max, to 0.06mm min. It's not ring gear runout, either the ring gear tooth are not consistent, OR its the pinion cut that not consistent, I tend to think its the pinion cut.
3. Perhaps this new gear that is originally for a landcruiser from the 80's has a different height centerpoint (center of ring gear to pinion axis) ,compared to the mk3 supra housing. I say this because I went deep and shallow on the pinion depth, but only the drive side pattern is changing, the coast side seem to have no change ! That is very odd to me.
4. The noise is now on accel and decel, still worse on decel, and if i go very slow, I can hear the alternating intensity of the sound, the faster I go the sound is like "one coherent unit", and if very slow, its cyclical or position based. This time the noise is not a knock but a "grind", kinda like when you use a grinding stone.

I agree about the hum at 45 - 50mph, but that is totally acceptable and hardly noticable unlike the issue I have now.
So here is my plan, as I can't just leave this be, it's just who I am. I am getting old at 46 years old now, but I still have that "fire" in me to get this done. The only "good" thing about all this I am now able to remove and reassemble the diff , as well as take apart and put everything back much faster than ever, while still being careful. I have gotten used to the diff internals and the procedures intimately over the course of these 2 months.
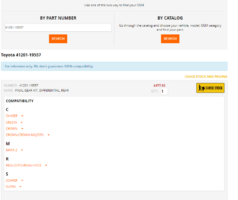
1. I am now trying to source OEM gears from Toyota
1665537235059.png
I will be making a purchase within this week, waiting time for toyota to make this part is 3 weeks, plus another week and half to pack and ship to me.
I am told the OEM gears are lapped as a pair before sending out, and this set is definitely meant for this housing. It's expensive, but I just dont have the time to fool around anymore.
2. I will get one 2.58mm shim, the thinnest one, just in case I need it, the pinion head shims, I should have them all this week.
3. This time I will insert the carrier center without ring gear and check it's runout.
4. This last point is very important, I need to find a way to test the diff before reassembling to the car. I was thinking of using the sockets and connectors for the inch-lb torque wrench and connecting it to a drill to turn the input flange on the diff and see If I can replicate the sound on the diff before I take it apart. At least if the sound is there when I do this, after another rebuild I can run this test and see if the sound is gone.

Yes, I would rather not do this, and pay some one like you, but to ship a 38kilo diff to the US by air would cost more than your asking fee for sure.
Btw, do you see anything wrong about this pinion head bearing ?
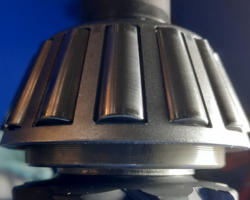
1665558498993.png
I see "scuff" marks on the rollers, I think I will just replace the bearing and shell as cheap security, since the pinion yoke bearing is brand new.
 
Last edited:

alcyon

Active Member
Jun 15, 2017
176
43
28
Kuala Lumpur
@Piratetip I need your help since you would have at least 1 mk3 diff with you out of the car.

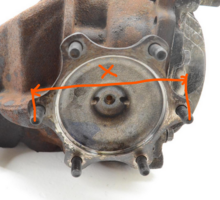
I plan to make a spinning wheel jig and I need this center to center measurement in mm.
1665625899189.png
I plan to make it with a double use, able to attach to the companion flange as well as this side flange, with rotating handle, so I can crank these shafts quickly.
 

Piratetip

Far From Maddening Crowds
Staff member
Super Moderator
Dec 30, 2005
1,177
69
48
39
MKE, WI
Well like you, I am too held up on a diff build currently.

I have most of the carrier side shims on hand, but have yet to encounter a diff that needs one thicker than .126".

This diff I am building is one that does, and it needs literally the thickest one available from Toyota.
So I placed an order for 3-4 more shims, build is on hold until they come in.
90201-52031 - 3.48mm or .137"
Likely on backorder, so may be awhile.
 
  • Sad
Reactions: alcyon

alcyon

Active Member
Jun 15, 2017
176
43
28
Kuala Lumpur
Piratetip, since I do have some time to kill, I need some info from you.

1. For the last few mk3 diffs you rebuilt, could you let me know the carrier shim thickness you used on ring gear and opposite side ? With this info, I can guess if my carrier preload is in the ballpark.
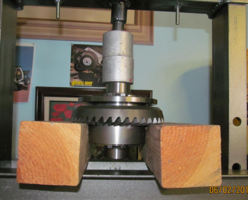
2. This guy Zuk uses this method to press in the ring gear, is this ok or better to heat up the ring gear ?
1665968002522.png
3. I am unsure if the skyline guy placed back the carrier bearing caps on the correct side. What is the consequence of the bearing cap being on the wrong side, or only their orientation is important(the 2 liitle protrusions face outside) . Is there anyway to tell if the caps are on the correct side ? I strictly put them where I found them, but the thing is I dont know if he put them back correctly, since he was the first to take apart the diff.
 

Piratetip

Far From Maddening Crowds
Staff member
Super Moderator
Dec 30, 2005
1,177
69
48
39
MKE, WI
1.
Carrier shim thickness should add up to ~.236-.237" give or take.
Actual thickness for each are honestly all over the place, they are almost never the same.
Sometimes .118+.121, or .114+.123, or .118+.119

How are you installing the carrier into the case, what order are you placing the shims vs. carrier?

2.
No I don't press on the ring gear.
I heat the gear in a small oven ~150-180°F

Gear drops on to the carrier with no effort, I hand tighten/align all 10 bolts and let it sit to cool.
Once its set in place I remove all bolts, red threadlocker and torque to spec in ~3 increments.

3.
Good question, I always match punch one cap side before disassembly so I know where to put it back.
Beyond that I can only think of one way, if you didn't know which side they were from.
The only way I can think of (if it happened to your vehicle), you can tell when the ring side bearing has overheated.
It leaves a dark color imbedded into the cast iron I.D. of the cap as well as the carrier.

Either way you should be ok though, these carriers are very well machined from what I have seen.
They may have been align honed at the factory with a certain orientation.
But I have never really noticed a difference in fitment, even when I put them on the wrong side.
 
  • Like
Reactions: alcyon

alcyon

Active Member
Jun 15, 2017
176
43
28
Kuala Lumpur
1.
Carrier shim thickness should add up to ~.236-.237" give or take.
Actual thickness for each are honestly all over the place, they are almost never the same.
Sometimes .118+.121, or .114+.123, or .118+.119

How are you installing the carrier into the case, what order are you placing the shims vs. carrier?
I insert the carrier with bearing shell into housing and slot the ring gear shim in, then slot the opposite side shim in, tapping the last shim in place with mallet and socket driver.
Btw, your carrier shims total is very thick, I went the tightest at 0.23" which is 5.8mm. On that build, there was no sound on accel, but knock on decel. The shims were very hard to knock in. I wonder if I should go tighter. Afaik the TSRM states to insert shims till there is no gap, then add a shim that is thicker by 0.06mm(0.002") to 0.09mm(0.0035").
But the one thing I dont get is, why is there a need for so much more preload when the original preload was only 5.7mm(0.023") ? My guess is even with new bearings I should not need to add that much preload for this carrier and housing.
 
Last edited:

Piratetip

Far From Maddening Crowds
Staff member
Super Moderator
Dec 30, 2005
1,177
69
48
39
MKE, WI
I will send over my method to you later today.
This is one instance where the TSRM gets it wrong, there is a better method.

Even at the factory they never set preload correctly on the carrier bearings, that and I have run across many with big gouges in the steel plate from the cast iron.

My total plate thickness is higher because it has to be in order to hit proper preload on those bearings.
Very little preload on those bearings well help induce Gear slop / movement ect...
It causes problems when not done right.

For vehicles I have built these for in the 1000+HP range, I go even higher on preload.
Helps hold everything together where it needs to be.
Carrier insertion gets a bit tricky, but it's doable.

There are lots of little trucks on these diffs that need to be learned to setup properly.
Finicky little beasts.
 
  • Like
Reactions: alcyon

Piratetip

Far From Maddening Crowds
Staff member
Super Moderator
Dec 30, 2005
1,177
69
48
39
MKE, WI
Yeah they do have some automated systems to assist with shim selection and assembly.
They are not all hand built, too time consuming. (unless you visit bespoke plants like Acura PMC, Lexus Motomachi or Nissan Yokohama GT-R engine plant)

I have spent some time in a number of different Automotive assembly plants over the years.
Due to my field Automotive Engineering its nice to be able to see the inside workings / methods they use.
Its quite interesting to see how parts are assembled these days, and the differences between Japanese/ American/ European brands.

@3p141592654 how is your diff build holding up? Everything good?
 
Oct 11, 2005
3,816
16
38
Thousand Oaks, CA
That makes sense. With the right metrology and models it should be possible to put it together right the first time. My diff is perfect. No complaints, and quiet too.
 

alcyon

Active Member
Jun 15, 2017
176
43
28
Kuala Lumpur
Looks like my gears are coming this week only, probably friday 28th October. And I need to leave for Mantova, Italy on the 30th, and stay for 2 weeks for my job. My rebuild has to wait till I get back 2 weeks after. Sigh.
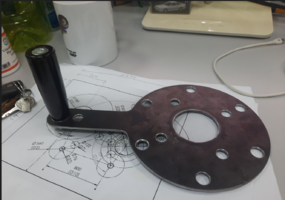
In the meantime, I got the hand crank that I designed, made by lasercut and a crank handle.

1666406882546.png
Its dual use, it will work on the companion flange, and the side flange. For side flange, bolt this to one flange, and stick a 2x4 on the other flange to keep it from moving, and crank on this to turn the ring gear.
 

alcyon

Active Member
Jun 15, 2017
176
43
28
Kuala Lumpur
So it seems my trip is postponed to 6th, which is the following week, I took the chance to quickly rebuild the diff since i have everything, or at least i thought i did.
When I took apart the China made gears, I saw the reason why it was so noisy.
The scuff marks show that the pinion is too shallow. I also have a feeling the carrier preload is too little, at total of 5.67mm, so it could have flopped the ring gear away while on and off power.
1667090651233.png
I proceed to install the new ring and pinion. I pressed in the pinion bearing and used the original pinion shim (1.97mm). Set preload a tad tighter than before. Tried a few different shim combinations with much higher carrier preload. I noticed on my first rebuild with my old OEM gears the carrier preload was 5.79mm, it was the highest preload I had ever put on this diff, and there was no sound on accel. So whatever preload I set must be higher than 5.79mm, I now go for 5.82mm.
I settled for 2.79mm ring gear side, and 3.03mm other side. Problem is backlash is 0.2mm, which is too big, but since I dont have any shims thicker than 2.79mm for the ring gear side, I cant do much. I ran the pattern :
1667091525501.png
1667091627546.png
1667091746903.png
1667091805419.png
1667091863666.png
I think the pinion depth is ok. I actually wanted to order carrier shims, but I got an idea last night which would speed things up considerably. I have a machinist supplier who can do precision grinding on these shims. So i plan to sacrifice the super thick shims which I would never use anyway, namely 3.27mm,3.24mm,3.21mm3.18mm and 3.15mm I will ask him to grind them down to and 2.94mm, 2.91mm, 2.88mm, 2.85mm and 2,82mm . With a 2.85mm Gear side and 2.97mm other side I am projected to get 0.15mm backlash. It is projected I can finish up the diff on thursday night, bring it back on friday night, install on saturday(5th) morning and fly to italy on Sunday (6th).
One thing i learned about spinning with a drill, is it's not a viable method to check for noise. The drill itself makes some humming noise when loaded, and the socket used to turn the large nut has some slop between it and the nut, so it makes a "chopping " sound. I will use my handcrank to test the diff.
So after getting the right backlash which i predict will be wednesday , I will run pattern again. So what do you think of the pattern so far ?
 
Last edited:

Piratetip

Far From Maddening Crowds
Staff member
Super Moderator
Dec 30, 2005
1,177
69
48
39
MKE, WI
Can you use yellow marking compound?
Contrast on blue is really difficult to see what is going on.

Also how are you rotating the diff to get the gear pattern?
Holding the pinion with a rag very tightly in the hand and rotating the carrier is the preferred method. (both directions)

I have tried using a drill in the past to try and locate gear sounds, it does not work.
An ear to the case and rotating by hand with pressure is the only method I have found where I can isolate dings/marks/damage to the gears.
Takes awhile but you can hear a proper mesh sound vs. abnormalities.

If you post up the pattern on the pinion this will also give you more information on if your pinion depth is correct.
Sometimes easier to read the pinion vs. the ring.
 

alcyon

Active Member
Jun 15, 2017
176
43
28
Kuala Lumpur
Can you use yellow marking compound?
Contrast on blue is really difficult to see what is going on.

Also how are you rotating the diff to get the gear pattern?
Holding the pinion with a rag very tightly in the hand and rotating the carrier is the preferred method. (both directions)

I have tried using a drill in the past to try and locate gear sounds, it does not work.
An ear to the case and rotating by hand with pressure is the only method I have found where I can isolate dings/marks/damage to the gears.
Takes awhile but you can hear a proper mesh sound vs. abnormalities.

If you post up the pattern on the pinion this will also give you more information on if your pinion depth is correct.
Sometimes easier to read the pinion vs. the ring.
Problem is yellow compund is im possible to get, i used water colour before but it doesnt seem to give an accurate pattern . With the water colour it seems to wipe off the edges giving impression its too shallow. I decide to change the carrier bearings too just to make sure. The carrier bearing shell seems to have a lot of scuff marks. I did put a screw driver in the lock plates to turn the ring gear while loading the pinion but its bending the lock plates. I will now use my handcrank to turn the pinion, while loading the ring gear with a block of wood.
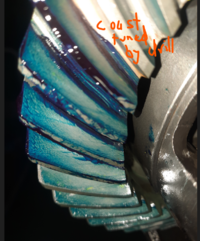
Edit: looking back at the pics of the pattern with the china gears, the pattern looked good, not shallow, but the mark made on the gear after 1hr plus of run in shows that it became shallow, it could be that the ring gear moved away because of insufficient carrier preload.
 
Last edited:

alcyon

Active Member
Jun 15, 2017
176
43
28
Kuala Lumpur
I replaced the carrier bearings today. I also received my new range of shims, 2.82, 2.85, 2.88, 2.91 and 2.94mm.
So I reassembled everything, and from a 2.79mm Left shim I increased it to 2.85mm to get a good backlash. And indeed I got very good backlash.
1667398945878.png
However, I still have that cyclical knock on reverse. It's not the bearings coz all the bearings are new. Pinion preload is higher than previously at 1.2Nm or 11 in lb. When I rotate the pinion to mimic running in forward, its silent all around. When I mimic reverse, it knocks at 1 particular pinion position. It cant be the ring gear, because it keeps knocking at one same position where the crank handle is , every 1 rotation of the pinion. The ratio is 4.56, so if its the ring, it would have happened roughly every 4.5 turns of the pinion, but its happening every turn of the pinion. I cant spot anything wrong with the pinion, but I plan to turn the pinion, find that spot where the noise is , freeze the pinion, remove the carrier, then mark the pinion tooth. Then remove the pinion and inspect the whole tooth profile with a magnifying glass , together with two adjacent tooth. If i find anything, maybe dremel polish it a little. I also thought perhaps its a dent in the companion flange causing this noise, but it doesnt make any noise without the ring gear in. But If I can't find the cause, what then ? Maybe the housing is the problem ?
I ran a pattern check, and I think the pinion depth is ok. This knock sound is what worries me now.
1667399727656.png
1667399995312.png
1667399761042.png
1667399795626.png
1667399831525.png
1667399869141.png
1667399931941.png


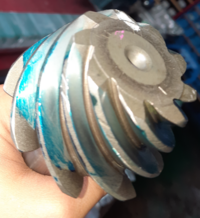
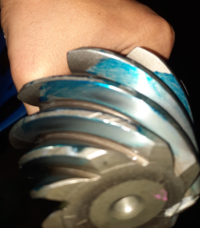
Edit : pinion pattern included below . White paint on the front is the tooth I froze the pinion movement at.
1667456108316.png
1667456167672.png
 
Last edited:

alcyon

Active Member
Jun 15, 2017
176
43
28
Kuala Lumpur
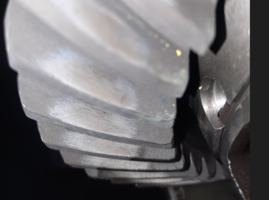
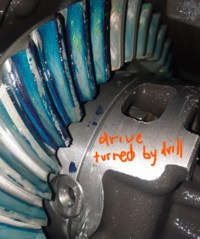
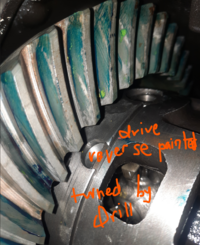
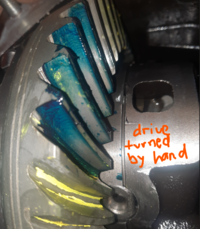
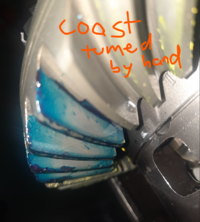
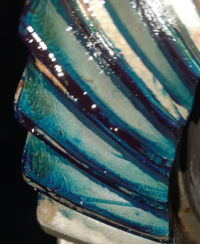
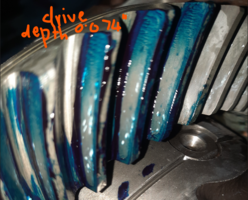
I think I found the pinion spot that is causing the sound. It was two tooth upper from where I thought it was supposed to be, I cant feel any dent/lift with my fingers but I can see it with a magnifying glass. I proceed to dremel polish that spot the best I could.
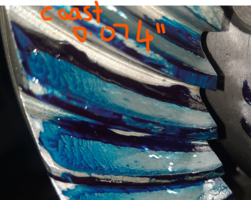
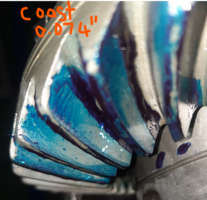
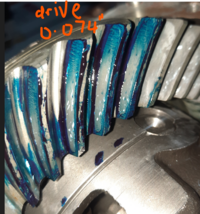
I then pulled 0.004" of the 0.0775" Pinion shim, to get 0.074".
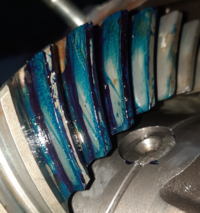
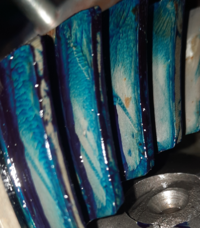
There was a marked improvement in the patterns, its not so deep.
1667485991152.png
1667486065005.png
1667486113099.png
1667486163043.png
And guess what, the knocking sound on revers ..GONE ! I dont know what caused the sound to be gone, the dremel polishing, or the reduced pinion depth. There is some sound when the teeth go over each other, some a little more noticable than at other areas, but overall it's a VAST improvement. So Should I button this up ?