MickyG's MX-73 to 7M-GE Swap

mickyg

7MGE MX-73
Sep 15, 2005
406
0
0
46
Melbourne AU
What and run the risk of going postal on all the innocent drivers on the way here? :p

I'll see how I go on the dead block. I've got a lot going for me on this one because it's only one material. With the cam housing, the bit kept wandering to the softer alloy and getting caught between the two different density materials. It's no wonder I kept breaking things!
 

mickyg

7MGE MX-73
Sep 15, 2005
406
0
0
46
Melbourne AU
Update!

Last Night:

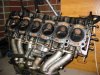
Decided to spend about an hour tearing the motor down in preperation for pulling the head. I managed to get everything stripped off in the hour I set aside but wasn't actually able to start removing the head.

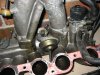
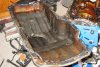
I was surprised to learn the 7M-GE uses a variable length intake system. Finally, I know why the intake system looks "different" to the 5M! What I don't yet know, is if the 7M on the stock Cressidas have the same system. It's called "ACIS" by the way (Thanks for the info Ian!). It's an acronym for Acoustic Control Induction System. There's a nice writeup about it here: http://www.turbomr2.com/MR2/Reference/TVIS/TVIS.htm

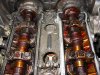
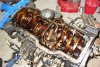
I found a fair bit of carbon deposits on the cams but nothing too scary. It was surprising to see the exhaust side looked cleaner than the intake though.

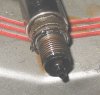
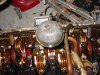
The plugs all look almost brand new but all 6 had a thin, black, oily coating on them. The insulator was completely black as well. Obviously getting a bit of oil in the cylinders but whether it's from rings or valves is not clear. The tops of the pistons (from the small peek I got of them) were also black and glossy, as if they were wet.

I'm a bit worried by the lack of wear on the backs of the cam lobes as it suggests the shims are out of spec. Unless that's normal! I'm not looking forward to having to replace shims. They're expensive and I don't have the proper measuring tools yet!

Here's some pics (ACIS actuator, cams, one plug sample):
 

Attachments

  • ACIS actuator.jpg
    ACIS actuator.jpg
    112.1 KB · Views: 27
  • cams.jpg
    cams.jpg
    161.4 KB · Views: 32
  • plug.jpg
    plug.jpg
    48.8 KB · Views: 24

mickyg

7MGE MX-73
Sep 15, 2005
406
0
0
46
Melbourne AU
BosoMKII said:
I am interested in how you go about tapping for the dipstick. What will you use to plug the old spot? Is it threaded so you can use a bolt?

I like your project. Its cool. I think much of our research overlaps! I will be checking in with you when I need advice! hahah

Boso: Thanks for your interest! Likewise, I'm also very interested in your progress. In fact, I think you'll be done a lot sooner than I am! About the only thing I might finish before you is the dipstick relocating and I'll be sure to share my results here.
 

BosoMKII

New Member
Apr 24, 2006
497
0
0
NorCal
Cool, I will be checking in for updates.

The spark plugs that came out of my 7M looked just like that, but I never took the head off. I will be interested to see what you discover.......I am keeping my fingers crossed!

Your cams don't look too bad to me. The reddish color of everything under there, is that coked on oil? My 7M had some of that, but not as much.
 

mickyg

7MGE MX-73
Sep 15, 2005
406
0
0
46
Melbourne AU
Yeah, cooked on oil and probably a lot of blow by from the PCV. Actually, now that I think of it, that explains why it's so much worse on the intake side, as that's directly plumbed to the crankcase!

The cams themselves look to be in good shape, I'm just hoping the clearance between cam and shim is meant to be something more than touching. I was talking to my bro, Jake (IHI) and he mentioned there should be a very small amount of clearance between back of cam lobe and shim, so as to minimise the harshness of the cam "slapping" the shim as it comes around. I'm not sure what sort of clearance that is though.

I guess I'll have to check the trusty TSRM for that!

Edit:

Intake .15mm - .25mm
Exhaust .2mm - .3mm

So the answer is yes, something more than touching!
 
Last edited:

mickyg

7MGE MX-73
Sep 15, 2005
406
0
0
46
Melbourne AU
Lastnight:

I removed the old Soarer head from the motor I'm salvaging near where I work. The washers on the head bolts where a perfect fit for the missing "spacers" on my engine stand!

So that's the first thing I did - remove the wrenches and replaced them with 2 washers each.

Then spent some time preparing to remove the head. Planned on doing everything in about 45 minutes but totally underestimated how difficult it is to get old crusty coolant hoses off! I probably spent 45 minutes just doing that! When everything was removed, I grabbed the tool case and realised I'd left my breaker bar and 1/2" to 3/8" adapter at work! DOH!!!

I then decided to move on to the oil pan, just to see what's hiding under there! After nearly getting my arm torn off when the motor rotated on the stand violently, I went to work on the bolts. Unfortunately, there was so much sealant used, it took me just as long to break through it all as the bolt removal did! I ended up using a block of wood and a sledge hammer to knock it loose!

I grabbed a few pics and called it a night. What was supposed to be 45 minutes ended up being 2 hours!

Pics (old 5m head, sump with what looks like a lot of metallic sludge, crank with lots of fairly greyish oil, oil strainer closeup:
 

Attachments

  • 5mhead.jpg
    5mhead.jpg
    118 KB · Views: 45
  • sump contents.jpg
    sump contents.jpg
    92.1 KB · Views: 32
  • 7m bottom.jpg
    7m bottom.jpg
    121.9 KB · Views: 32
  • oilstrainercloseup.jpg
    oilstrainercloseup.jpg
    118.5 KB · Views: 28

BosoMKII

New Member
Apr 24, 2006
497
0
0
NorCal
Always takes longer than you think. So that oil pan and pickup in the photos is mid sump right? I thought Soarers where front sump?
 

mickyg

7MGE MX-73
Sep 15, 2005
406
0
0
46
Melbourne AU
Sorry, I didn't clarify that. Thanks for pointing out an obvious place for people to get confused!

The Soarer motor is an old 82 (I think) 5M and is quite dead. It is entirely different to the new 7M that I'm putting into the Cressida. The old Soarer motor is just a chance to rob parts for the new 7M, among which is the pan and oil pump.

I want to build the 7M up completely before putting it in. I realise a few of of the parts currently on my car will need to be swapped over but my hope is that those parts will be fairly trivial to do and not very time consuming (that may be a huge ask).

The pan you see in the pics is from the new 7M. I really should have left the pic of the 5M head out!

Does that make a bit more sense now?
 

miggles

i wasnt speeding officer
Jun 3, 2005
526
0
0
48
perth West Australia
nice work dude, yeah just be careful when your spinning the motors as they tend to be bottom/top heavy (depends if the head is on or not). make sure the locking pin is located before working on it.
Last thing we need is a "how do i fix a broken arm?" thread :icon_razz
 

mickyg

7MGE MX-73
Sep 15, 2005
406
0
0
46
Melbourne AU
:bigthumb: Good advice Mik!

I was thinking it'd be nice if someone made an engine stand with two bearings in the rotating assembly but I guess that'd be asking too much.
 

mickyg

7MGE MX-73
Sep 15, 2005
406
0
0
46
Melbourne AU
Items accomplished lastnight

Zilch! I had fully intended on removing the head at the very least and grabbing some pics but ended up bundled up on the couch with the shivers and a mild fever. I've been fighting a nasty cold for about 3 weeks and things got much worse last night.

If I snap out of it today, I'll proceed with last night's plans tonight.
 

IHI-RHC7

"The Boss"
Apr 1, 2005
1,310
0
0
40
Oregon
Failure!
No kin of mine should be getting sick, you must be alergic to kangaroos...
Nice progress!
Do you still need the various parts? I've got them isolated from the rest of the supra graveyard, and I'm wondering how you can incorporate "speed control" as it's formally labled by toyota, into the cressy.
Is the harness ready to accept the components, or do I need to send you an entire vehicle harness as well?
I do have an NA parts car up out here, so let me know what your plans are.
Oh, no ACIS in cressies over here, they got turbo intake mani's
 
Last edited:

BosoMKII

New Member
Apr 24, 2006
497
0
0
NorCal
HA yeah whats all this getting sick stuff? So stand over the motor and drip snot on it. Makes a great polishing agent.
 

mickyg

7MGE MX-73
Sep 15, 2005
406
0
0
46
Melbourne AU
IHI-RHC7 said:
Failure!
No kin of mine should be getting sick, you must be alergic to kangaroos...
Nice progress!
Do you still need the various parts? I've got them isolated from the rest of the supra graveyard, and I'm wondering how you can incorporate "speed control" as it's formally labled by toyota, into the cressy.
Is the harness ready to accept the components, or do I need to send you an entire vehicle harness as well?
I do have an NA parts car up out here, so let me know what your plans are.
Oh, no ACIS in cressies over here, they got turbo intake mani's

Kangaroos, that's what it must be! I never used to get sick for this long back in the states, so it's got to be the wildlife - why didn't I think of that before!

I still need the various parts and probably more! About the "speed control" I'm not entirely sure. I'll have an NA Supra ECU (preferably auto) at some point so it should integrate perfectly into the electronics. As for the mechanical integration, that might be a bigger challenge. I don't know if the cruise ECU needs a speed reference from the transaxle or what the deal is so that could be fun to try to figure out. The mounting and running of cables will also be a challenge. That's all part of the project though!

I have the engine harness but you're asking about the vehicle harness now and to be honest, I hadn't even considered it! I don't know how much of the ECU connects to the rest of the vehicle's wiring so I can't answer that yet. If you have any pointers, I'd love to hear 'em. The original plan was to modify the existing car harness to connect to the ECU. That may be very difficult without the correctly plugs on the ECU side.

I think the cressies here are exactly the same. Definitely the same looking intake plenum as the turbo supras. I think it's specifically designed for low to mid range torque and economy. That last one has me just a bit worried because having higher RPM torque is going to be fun and fun usually doesn't equal economy!
 

mickyg

7MGE MX-73
Sep 15, 2005
406
0
0
46
Melbourne AU
Thanks Allan, I'll do that!

Today!

Got the head off and discovered cylinders 3 and 4 appear to be good. The rest are blown baby! Pics coming up later today.

The really good news is that all 6 cylinders look really good and crosshatch pattern is still very obvious. No sign of rust or anything terrible in the cylinder walls.

Anyone know if it's possible to blow a head gasket and not have it warp the head? I'm dreading machine work because of expense but guessing I'll have to go that route anyway.
 

IHI-RHC7

"The Boss"
Apr 1, 2005
1,310
0
0
40
Oregon
Doesn't that Ian char have machining abilities???

Anywho, the thing is that the cruise has a recessed plug on it, so it's not like you can splice wires to make it work, you'll need a harness under the dash that connects to the cruise ecu.