Diff rebuild by "pro" not going well

Piratetip

Far From Maddening Crowds
Staff member
Super Moderator
Dec 30, 2005
1,177
69
48
39
MKE, WI
Richmond might be ok.
But I agree with Andrew, stay away from SVL / Dana gearsets.

They key is getting another with 27 spline pinion.
Otherwise go with a new Nitro gearset, you will have to convert the seal/flange/nut to the larger 29 spline.

Otherwise find another good used OEM gearset
 
  • Like
Reactions: alcyon

Dave 1jz

New Member
Feb 16, 2010
22
6
3
rotterdam
Very nice informative topic. I also rebuild my own diffs. Piratip already gave much useful information. My experience with solid spacer is not great. A crush sleeve works very accurate and worry free. For setting pinion depth i honed out a old top bearing, so i can remove the shaft easily.

Wonder at what situation one would need a solid spacer, 500+ whp? or 600+Nm of engine torque?
 
  • Like
Reactions: alcyon

alcyon

Active Member
Jun 15, 2017
176
43
28
Kuala Lumpur
I did some investigation today. I know for sure that the noise is happening when the rear wheels are on the ground and moving forward, even though the speed is very low (15 to 10kmh) and transmission is D (engine braking) as well as N (no engine braking) . So naturally I suspect the ring and pinion. But from a few process of elimination I am not sure now.
I jacked up the rear and placed on jackstands. Put Trans in N and parking brake off.

1. I placed some wooden blocks under left wheel. Turn right wheel with my hand as fast as I could, the grinding/rattling noise not present.
Moved the wooden blocks to right wheel, turned left wheel as fast as I could, also no such grinding rattling noise. This is basically forcing the ring gear to turn pinion gear, simulating a coast condition.
2. Removed all wood blocks, went underneath, used both hands to move both wheels forward, forcing ring gear to turn pinion gear and prop shaft. Couldnt move wheels as fast as before but also no grinding rattling noise, and my head was right under the diff so i can hear very closely.
3. Removed prop shaft from diff and tried to rotate companion flange with one hand, it was tight and initially difficult to break loose , once break loose, rotates smoothly all around in both directions.

Conclusion, pinion preload is intact. Ring and pinion also should be ok.

4. Started up car suspended, put in D, rear wheels moving at 20kmh, put in N, still smooth until wheels stop. Put in D accelerate to 50kmh, move gear to N, coasts smooth all way until wheels stop.

5. While trying to break the propshaft loose from diff in step 3, I pulled handbrake and put in D(4 prop shaft bolts removed of course), but noticed the left rear wheel wasn't moving, right rear wheel moving, looks like handbrake adjustment uneven, then checked both rear wheels at 12 to 6 position and give it a shake, left rear wheel has small amount of shake. Proceed to torque down left rear wheel cv axle nut, no more shake. Considering the supra uses a one piece bearing, I would think tightening the CV axle nut shouldnt affect the shimmy of the wheel hub.
6. Seeing that left rear parking brake force is greater than right rear, I remove left rotor and inspected the parking brake mechanism against TSRM, see nothing wrong, so proceed to contract the parking brake shoes to weaken the brake force.

Now I am beginning to suspect either left rear wheel bearing, or cv axles. It could be I didn't assemble back the tripod joint to the exact chamber (3 possible combinations) of the inner joint, causing a rubbing noise on decel. Or left rear wheel bearing. Now why do I suspect this bearing? Months ago while the skyline dude was rebuilding the diff, I tried removing the CV axle to rebuild, but it was stuck. So I removed the whole rear knuckle and asked him to press out the cv axle from the hub. Since he used a hydraulic press to force it out, he could have damaged the bearing internally, by just a little.
The 3rd cause could be the uneven parking brake adjustment , of which I just corrected.

All that''s left now is to test drive the car, hopefully the sound is gone. I will know in a few hours.
 
Last edited:

Dave 1jz

New Member
Feb 16, 2010
22
6
3
rotterdam
Not saying my situation is similar to your problem, but recently i replaced the pinion bearings (with crush sleeve) due to a slightly too high preload on the solid spacer and perhaps vibrations of the propeller shaft. During installation of the rebuild diff i found that the propeller shaft universal joint at the diff flange had a slight radial movement. I had a (professional) rebuild and balanced aluminum one-piece shaft already laying around and fitted this one instead of the old two piece. This made a world of difference in both total drive train backlash/slack and vibrations. And i only had like 0.4mm radial play by hand. Makes me wonder how all three universal joints were faring under load. So the two-piece is definitively due for a rebuild after 30 years of service. Something to consider.

Also regarding setting the pinion bearing preload, there was something about constant turning and break away. I fully agree the measurement should be at constant turning. However, the break away torque should not be much higher than constant turning. Using a crush sleeve helped me greatly to slowly tighten the the nut to initially remove the clearance (already at 300+Nm) and build up the 'constant turning' torque without a significant increase of breakaway torque. If you experience a relatively high step between breakaway and constant torque, chances are you overshot the target value.
 
  • Like
Reactions: alcyon

alcyon

Active Member
Jun 15, 2017
176
43
28
Kuala Lumpur
Not saying my situation is similar to your problem, but recently i replaced So the two-piece is definitively due for a rebuild after 30 years of service. Something to consider.

Also regarding setting the pinion bearing preload, there was something about constant turning and break away. I fully agree the measurement should be at constant turning. However, the break away torque should not be much higher than constant turning. Using a crush sleeve helped me greatly to slowly tighten the the nut to initially remove the clearance (already at 300+Nm) and build up the 'constant turning' torque without a significant increase of breakaway torque. If you experience a relatively high step between breakaway and constant torque, chances are you overshot the target value.
My prop shaft was rebuilt and rebalanced. It seems smooth at the joints and no vibrations felt under me.
As for the pinion preload, i was getting about 8 in lb constant turning. The breakaway was over the scale of the wrench, but then again the upper limit of that wrench is about 25 in lb only. Through my hand the breakaway torque doesnt feel that high, as I am no gorilla, only 5ft 10" and 165lbs, so I guess its ok.

Edit Saturday the 24th Sept 2022. a thought just occurred . Have not tested tested the car, but I have a baaad feeling the noise will still be there. You see, with all tests done yesterday, its with the oil cold. Plus with the rear jacked up, all the cold thick oil is submerging the whole pinion, giving extra cushion between the gear tooth.
I actually need to do the hand rotate test with oil drained from diff. If the ring and pinion is good, forcing the ring to turn the pinion at hand speeds should not cause a noise. If it does, its a sure sign the coast side of the pinion is bad. Besides, there will still be residual oil over the gear tooth.
It could have happened when the skyline dude rebuilt the diff with too much backlash, not enough carrier preload, and no pinion preload, causing the pinion to wobble around on coast and damaging the coast side.
It is important to be able to replicate the conditions on coast on the diff before putting the diff back on the car to save a huge amount of work .
I am also prepping the tiny video cam to go over the rear subframe body mount.
If with these conditions I can replicate the sound then for sure its the ring and pinion. I might go with this local brand . They claim their gears are easy to setup up and have pinion depth inscribed. Its also 1/3 the price of OEM gears. Also i need to wait a 5 weeks for OEM gears.
1663991542600.png
 
Last edited:

alcyon

Active Member
Jun 15, 2017
176
43
28
Kuala Lumpur
@Piratetip here is a video.

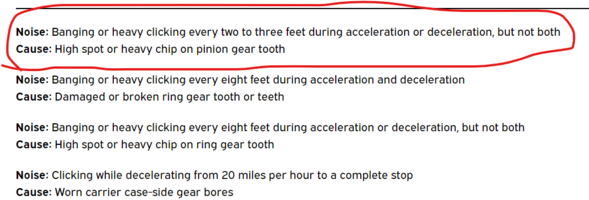
from the website onallcylinders , this is what I would describe as the closest symptom

1664029983960.png
I dont know why but the camera could not capture the sound properly. I was only able to spot the sound right after 13:10 and 13:45 mark, pay attention when I decelerate. sounds like a cyclical knock. The funny thing is i heard the sound in the car all the time i decelerate, and its certainly coming from behind.
Maybe i should record from inside the car near the transmission tunnel.
 
Last edited:

Piratetip

Far From Maddening Crowds
Staff member
Super Moderator
Dec 30, 2005
1,177
69
48
39
MKE, WI
I can kind of hear the noise.
What speed were you going?

Next step would be seeing if it's tied to wheel rotations.

Can't tell much from my end but the knocking sounds too slow to be tied with wheel rotations. (Hitting the same spot again and again on the ring gear)

I have some annoying poly suspension bushings that knock / pop / creak randomly.
Drives me crazy sometimes.
Someone else may interpret the noise as the car falling apart.

Sometimes quite difficult to pinpoint noise and it's cause
 

alcyon

Active Member
Jun 15, 2017
176
43
28
Kuala Lumpur
I can kind of hear the noise.
What speed were you going?

Next step would be seeing if it's tied to wheel rotations.

Can't tell much from my end but the knocking sounds too slow to be tied with wheel rotations. (Hitting the same spot again and again on the ring gear)

I have some annoying poly suspension bushings that knock / pop / creak randomly.
Drives me crazy sometimes.
Someone else may interpret the noise as the car falling apart.

Sometimes quite difficult to pinpoint noise and it's cause
The speed is never more 50kmh at maximum and i tried my best to get it between 20 to 13kmh up to near stop to replicate that sound only and isolate the noise from exhaust, turbo, engine and tyre noise. It is tied to wheel rotations, as most of the road has no major bumps, plus this is a 4.56 ratio, so there will be a difference in wheel rotation compared to the 3.73 that you are used to.
Only poly bushings in the system is Ronnie K's blue(super soft) subframe bushings, and those arent bad at all. There was no such sound before the 1st diff rebuild by skyline guy. I am gonna drain the oil and try to do a forced ring driving pinion test to see if I can replicate the sound.
 

alcyon

Active Member
Jun 15, 2017
176
43
28
Kuala Lumpur
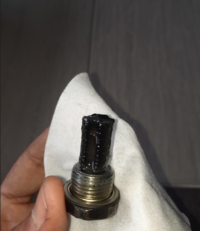
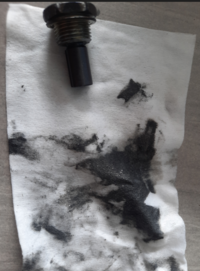
I drained the oil today. Again the oil looked dark, and the drain plug is full of gunk. But how can this be when the oil and gears only has 4 hours runtime ?
The only conclusion I can come up with is the gears are grinding each other. Wasted my money on Amsoil 75W-110 thrice..
1664110032406.png
1664110524255.png
So i decide to remove the diff. This time I removed it in record time, the major obstacle always is the prop shaft getting stuck to diff companion flange. what a pain.
Brought the diff to my factory shop and disassembled it, also in record time.
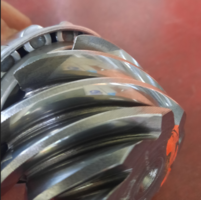
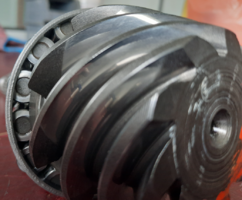
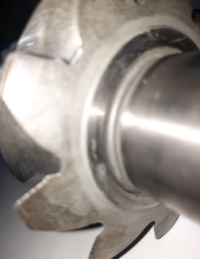
The pinion looks "polished"
1664110688390.png
1664110718093.png
The polishing goes all the way through the face of the tooth, maybe because there was too much backlash on the first rebuilt causing premature wear.

I am gonna replace these gears , cause I dont know what else could have caused so much gunk inside the diff. Overall the Ring looks ok, the pinion looks a little worn.
 

Piratetip

Far From Maddening Crowds
Staff member
Super Moderator
Dec 30, 2005
1,177
69
48
39
MKE, WI
Polished to a mirror gear faces aren't unusual, I see them all the time.
Usually the ones that are not abused / well taken care of.

But in your case, not sure.
Hard to diagnose these things over a forum.

Did you do full rotations of the diff while out of the vehicle before teardown.
In both directions.

For a noise that loud while driving, you would be able to feel inconsistencies in the gear rotations.
Even very tiny nicks/scrapes on the gear faces I can feel and hear by hand.
Sometimes need to put my ear on the diff case while doing this on the bench.

The debris after that short of a drive in the oil is a bit concerning, seems high.

Maybe the previous guy that "built" the diff allowed it to run too long in a piss poor setup.
Could have worn through the case hardened gear faces in some areas.
Once that happens the gears will wear out very fast.
Just ideas.

I am building one now that was run a long time with no / little oil.
Gear faces were eating through each other, these are going in the trash for a new Nitro gearset.


  • Like
Reactions: alcyon

alcyon

Active Member
Jun 15, 2017
176
43
28
Kuala Lumpur
Did you do full rotations of the diff while out of the vehicle before teardown.
In both directions.

For a noise that loud while driving, you would be able to feel inconsistencies in the gear rotations.
Even very tiny nicks/scrapes on the gear faces I can feel and hear by hand.
Sometimes need to put my ear on the diff case while doing this on the bench.

The debris after that short of a drive in the oil is a bit concerning, seems high.

Maybe the previous guy that "built" the diff allowed it to run too long in a piss poor setup.
Could have worn through the case hardened gear faces in some areas.

Once that happens the gears will wear out very fast.
Just ideas.


Yes I did test them both ways and no sound showed up. But I tested it by rotating the pinion. Its very difficult to force the ring gear to rotate with the diff cover on, while diff is off the car.
When you said this :
Maybe the previous guy that "built" the diff allowed it to run too long in a piss poor setup.
Could have worn through the case hardened gear faces in some areas.


This is my suspicion too. The high spots cannot be seen by eye, but its there on the coast side. Lets see how it goes in the coming weeks. Hopefully that ASLI 4x4 gears fit.

@Piratetip
Note, those pics of the ring and pinion you are rebuilding now looks really scratched up, must be really noisy.
Update 26 Sept 2022 Afternoon.
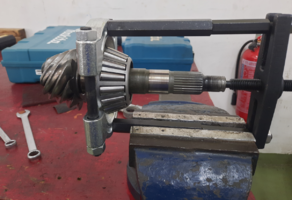
I bought a "cheapo" bearing puller 3 weeks ago, and figured I would try it first before using a press. I figured that it should work as I have lots of space above the pinion head, as Toyota seemed to have used a thick spacer (2mm). It turned out I was right. It wasn't easy, I did hear a few mini explosions as I wrenched on the puller little by little, being careful to ensure the puller doesn't engage the bearing cage.
1664172367287.png
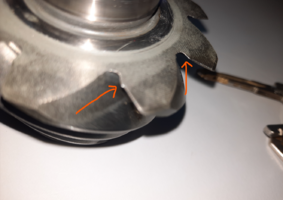
So now I got some close up pics of the tooth jagged edges.
1664172439708.png
1664172472353.png
 
Last edited:

alcyon

Active Member
Jun 15, 2017
176
43
28
Kuala Lumpur
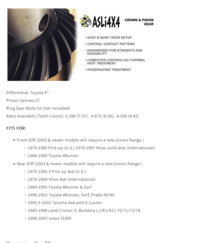
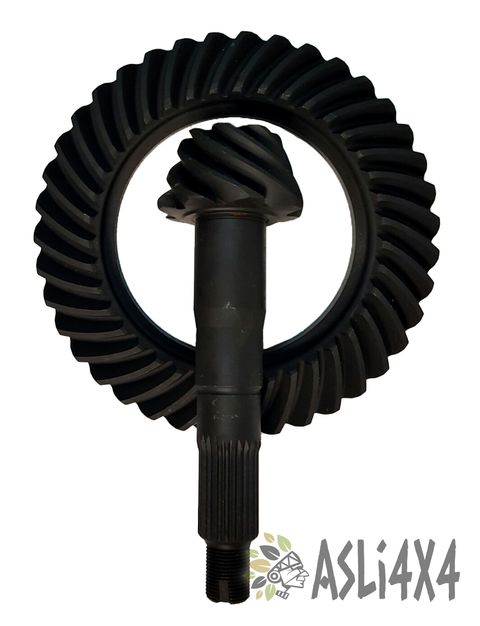
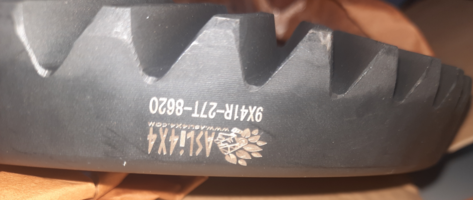
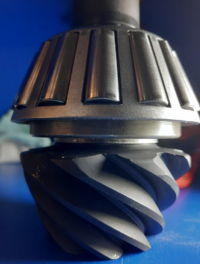
Update . Saturday 1st October 2022. I decide to try a local brand of gears ASLI 4x4, for the Toyota Landcruiser, ratio 9x41 8". There seems to be very little difference measurement wise vs the originals.
1664613833851.png
I installed the inner bearing and original 2mm shim with the fire and ice method.
1664613887497.png
I accidently ruined the outer pinion bearing so I had to buy a new one. To my dismay, the pinion bearing spacer from the old bearing of 0.57 + Spacer thickness was now too short, causing the preload to go overboard. I changed the shims to 0.75, it was 0 preload. I tried 0.7mm, got 4 in lb preload.
Reduced shims to 0.68mm, got 7 in lb. I am sticking with this preload.
Next i tried to set backlash. To my dismay, I found it hard to get a consistent backlash, I am planning to get a dial indicator with longer plunger so that I can comfortably position it clear of the ring gear, now its a little too close to the ring gear, so I cant place it perpendicular to the tooth.
After a start from 2.61mm L and 3.12mm Right, I went for 2.64mm L and 3.06mm R, then finally 2.7mm L and 3mm Right, and got a tight backlash. Procedd to check gear pattern.
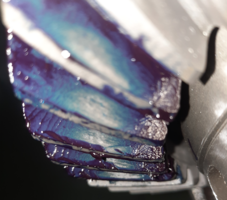
Drive side :
1664614406468.png
Pinion depth looks like not enough, so i need to add shims, perhaps another 0.5mm Now its too far of the face. More to the toe.

Coast below : quite centered from heel to toe, and the face is also too much.
1664614515205.png
So for now, i am making a few pinion head shims, and buying a few, before I can proceed. The good news is the rack and pinion press on my factory floor is enough to push out the head bearing.
So next course of action, get more shims, and a long dial indicator.
 

Piratetip

Far From Maddening Crowds
Staff member
Super Moderator
Dec 30, 2005
1,177
69
48
39
MKE, WI
The areas of the tooth you are marking is just machining kerf.
Every OE gearset has this, it's normal both on the pinion and ring.

You should inspect the areas of the tooth centered between the heel - toe, and root-face.
Where the contact pattern is located.

Yup any change, a bearing, a gearset, a LSD center swap.
All will change the setup, it's nearly impossible to just swap parts and expect the setup to be the same again.
 

alcyon

Active Member
Jun 15, 2017
176
43
28
Kuala Lumpur
The areas of the tooth you are marking is just machining kerf.
Every OE gearset has this, it's normal both on the pinion and ring.

You should inspect the areas of the tooth centered between the heel - toe, and root-face.
Where the contact pattern is located.

Yup any change, a bearing, a gearset, a LSD center swap.
All will change the setup, it's nearly impossible to just swap parts and expect the setup to be the same again.
Sorry @Piratetip I di not understand what you mean about the kerf. The pattern is too shallow from what I see. I should add a thicker shim ?
 

Piratetip

Far From Maddening Crowds
Staff member
Super Moderator
Dec 30, 2005
1,177
69
48
39
MKE, WI
The old gearset is what I was referring to in regards to the kerf Not the new one.

Pattern does look shallow, but not much. Maybe .002" more shim on the new gearset
 
  • Like
Reactions: alcyon

andrew_mx83

Member
Mar 22, 2008
100
3
18
Melbourne
Unscrew the tip from your dial indicator, measure the thread and use a suitable bolt as an extension. Cut the head off and chamfer the end with a grinder so it's nice and rounded. It's probably an M3 or 1/8" thread.
 
  • Like
Reactions: alcyon

alcyon

Active Member
Jun 15, 2017
176
43
28
Kuala Lumpur
Update:
I bought some shims from a local seller, but he only has a few thicknesses. 1.7mm, 1.73mm , 2.3mm and 2.36mm.
I decide to try 2.3mm(0.09") first. It is 0.33mm(0.013") over the original shim of 1.97mm(0.078")
with the pinion so deep, i had to use a thinnest carrier shim i have to get proper backlash.
Drive side went very deep:
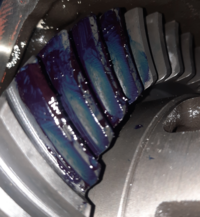
1665154324071.png
Coast side seem to make no difference :
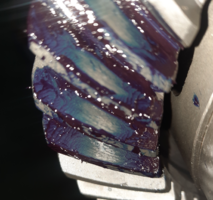
1665154404962.png
So I got my machinist to cut down the 2.36mm (0.093") shim to 2.1mm(0.082"), which is 0.13mm (0.005")over the original shim, I know you suggested 0.05mm(0.002") only, but I dont have those shims yet. I ordered special 45x35x0.1mm shims and they are only coming next week. with a 1.73mm shim plus 3 x 0.1mm shim I can get a 2.03mm which is 0.002" over the original shim as you suggested.

First I measured backlash of every single tooth, I made sure the ring gear runout is within spec, and it is only 0.03mm max.
But my backlash is all over the place. The loosest backlash is 0.22mm (0.0086") and tightest 0.05mm (0.002"), the average over 41 tooth is 0.15mm (0.006")
This variation is caused by either the pinion or ring gear profile.
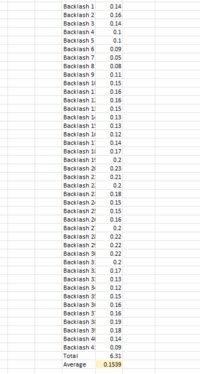

1665154138297.png
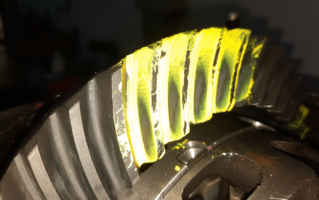
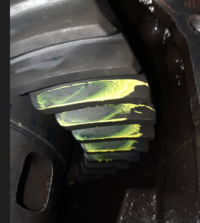
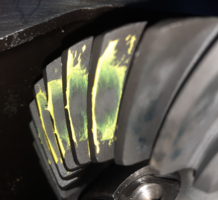
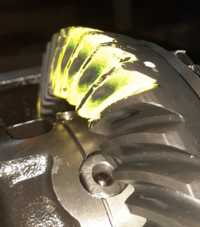
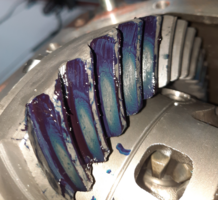
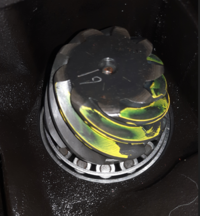
Seeing that there is nothing much that I can do about it, i proceed to get the gear pattern, this time I used yellow water color paint for much clearer pattern. Pinion head shim is 2.1mm(0.082"),
Drive depth seems ok, pattern more to toe
Drive
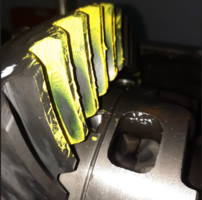
1665155295777.png
Drive :
1665155356587.png
Drive leftover paint :
1665155450675.png

Coast seems ok, pattern centered between heel and toe
Coast leftover paint :
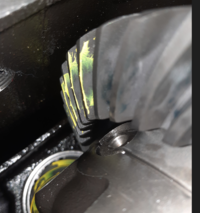
1665155503974.png
Coast leftover paint :
1665155555278.png
Coast
1665155598427.png
I dont think I can do any better than this. If I go deeper, the drive side will go deeper but coast remains the same, plus the deeper I go, the thinner the gear side carrier shim I will need, and I am already at the thinnest end of toyota's parts bin carrier shims.
If I go shallower, the coast side might be too shallow. The only next step I can go is 2.03mm(0.008") vs the 2.1 (0.083")
At 2.1mm pinion shim, the left carrier shim is now 2.61mm, the lowest toyota has is 2.58mm. If I go for 2.03mm pinion shim, I could probably use a 2.64 or 2.67mm carrier shim on the gear side, which I have with me.
Shall I run it as per yellow marked gear pattern ?
 
Last edited:

andrew_mx83

Member
Mar 22, 2008
100
3
18
Melbourne
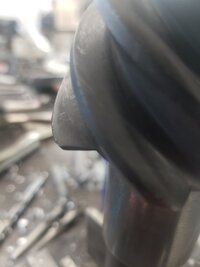
That was one of the problems with my SVL gears. Check carefully for burrs like this. Once I cleaned all of these up (there were a few, on both R&P) the BL variation was still there but improved enough that I could get all teeth in spec, just.

20200924_195526.jpg
 
  • Like
Reactions: alcyon

alcyon

Active Member
Jun 15, 2017
176
43
28
Kuala Lumpur
That was one of the problems with my SVL gears. Check carefully for burrs like this. Once I cleaned all of these up (there were a few, on both R&P) the BL variation was still there but improved enough that I could get all teeth in spec, just.

View attachment 80910
Thanks, andrew, but is the pattern acceptable ?
This is the pinion pattern :
1665198807070.png
I am contemplating going a little deeper, perhaps 0.03mm to 0.05mm, because looking at the actual tooth pattern today after the paint has dried, it still feels a little shallow.
But If I go deeper, I need to order a 0.58mm carrier shim. Update, I have decided to install as is. I cleaned off all paint residue and install front oil seal and the whole nine yards. Crossing my fingers that it's ok. I sanded the tooth edges that are jagged like andrew suggested.
 
Last edited: