ok so i was reading a forum and the guy has a auto tranny like me. i have really slow shifts and a guy post on there to "shimming your accumulators" he says the tranny last longer and has faster shifts. wat does "shimming your accumulators" mean?
wat does this mean
- Thread starter 91supran/a
- Start date
You are using an out of date browser. It may not display this or other websites correctly.
You should upgrade or use an alternative browser.
You should upgrade or use an alternative browser.
Heh sorry that post was poking a bit of fun at your spelling and grammar.
I cant offer much help on the subject as i am not intimately familiar with the insides of an auto box. You might Try searching both on this site and others. Someone more familiar with autos will hopefully chime in and shed more light on the subject.
Until then perhaps that will give you something more to look for to help answer your question.
Last edited:
I am not sure either i have a vague memory of watching "two guys garage" or some other speed channel program where they did something similar to the transmission from a fox body mustang or a camaro. It was a few years back so i am afraid i can't be of much help. We just need some transmission guru's to pop in this thread :biglaugh:
also, your spelling makes me giggle.:sarcasm:
also, your spelling makes me giggle.:sarcasm:
lol makes the girls giggle to when im talking to them on AIM! lol yeah we really do need some tranny experts cuase i really would like some quick shifting cuase mine sticks in first real bad it like hits 7 grand then backs off then shifts. its weird
ok...im going to try to explain this the best I can, If I can find the link ill post it for you.
As far as shimming the actuators you must remove the pan, filter ect...there are many bolts holding the valve bodies on, they are all different lengths, it is best to have the tranny out of the car so yu can flip it upside down and lift the valve body straight off.there are round actuators that control the shifts one is from 1st to 2nd, one from 2nd to 3rd, and one from 3rd to OD. It is best to do just the 1st to 2nd and 2nd to 3rd. You place metal spacers in the actuators so it takes less fluid to make the tranny shift ( it decreases the ammount of space in the actuator) By doing this it makes the tranny respond faster than normal. The bigger the spacer the less space, how big to go is up to you, there will be arguements each way, i personally used some a little less that 1/4in.
As far as shimming the actuators you must remove the pan, filter ect...there are many bolts holding the valve bodies on, they are all different lengths, it is best to have the tranny out of the car so yu can flip it upside down and lift the valve body straight off.there are round actuators that control the shifts one is from 1st to 2nd, one from 2nd to 3rd, and one from 3rd to OD. It is best to do just the 1st to 2nd and 2nd to 3rd. You place metal spacers in the actuators so it takes less fluid to make the tranny shift ( it decreases the ammount of space in the actuator) By doing this it makes the tranny respond faster than normal. The bigger the spacer the less space, how big to go is up to you, there will be arguements each way, i personally used some a little less that 1/4in.
Seriously, try putting together a correctly spelled, clear, and grammatically correct sentence. The old guys won't help you much if you continue to type like a 13 year old boy in a singles chat room meant for 20-30 year olds. Just a bit of friendly advice. Good luck with your tranny.
hmm I shouldn't have taken the time to type that, I found the link. Here is the direct copy from supra forums:
EDIT: Woops! deabionni beat me to it
After having one servere issue arise(we are working to correct it) I must strongly advise the following points.
1: It is best to do this mod with the transmission out of the car, the time saved by just pulling it will payoff on assembly
2: Get a new gasket, they are VERY sensitive to dust and such and can distort and bleed pressure
3: DO NOT OVER TOURQUE THE BOLTS. This is CRUICIAL you can warp the valve body or the transmission case when you do this. The spec is around INCH LBS, No airtools allowed for the valve body!
4: Do not mix your bolts up, they go in certain places.
The issue that has arrisen is a car shifting into reverse when it should go into overdrive, and it appears to be a pressure bleedoff issue, once we have that exact cause located, I will post it, and ways to avoid it.
Remove transmission(my preference)
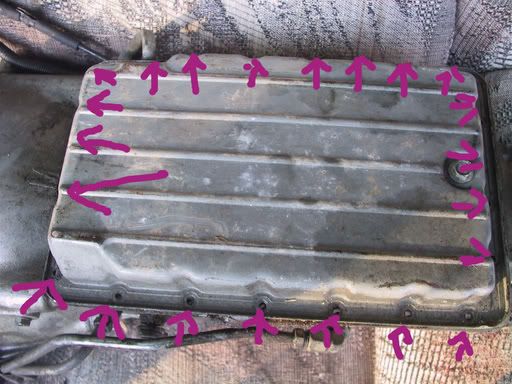
Remove the transmission pan bolts, I marked most of them, you can figure it out...
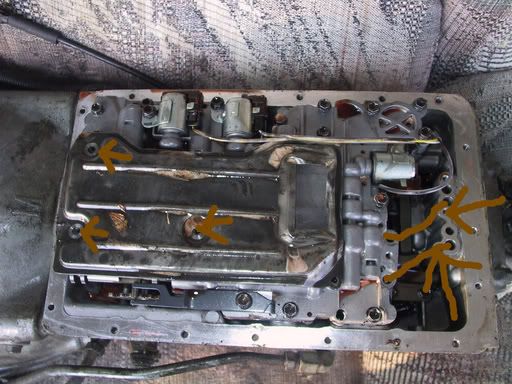
Remove the filter with the three marked bolts. Also there are two metal tubes, I already had them out so I drew them in, gently pry back and forth and they will come out
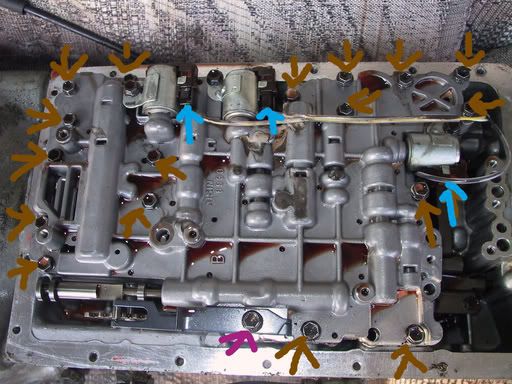
The fun part, my recommendation is do not take the bolts out of the valve body, they are specific on their location.
Completely loosen the brown arrows, loose till there is slack on the bracket for the purple arrow, and remove electrical connectors marked by blue. Before you can remove the valve body, you must disconnect the kick down cable, see next picture to see the bottom side of it
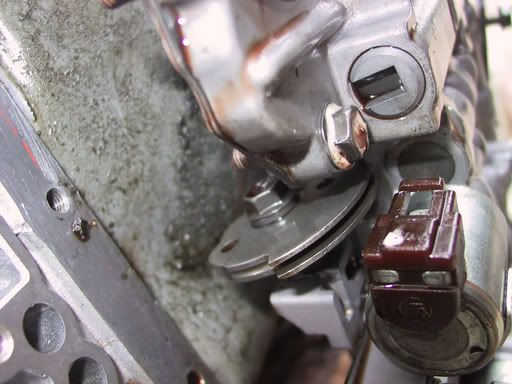
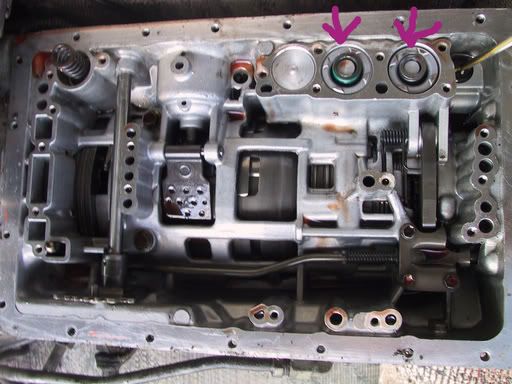
This is what everything looks like once you get the valve body off, The two "things" marked are accumulators, those two are the only ones we are concerned with at this time
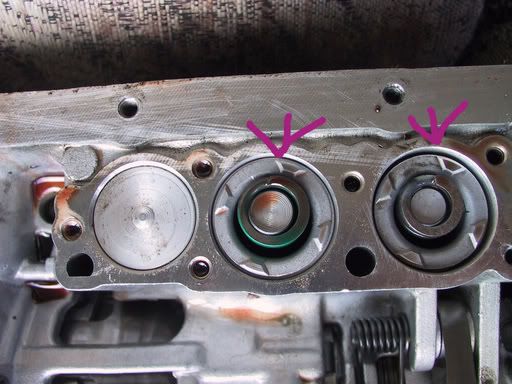
A close up of the accumulators
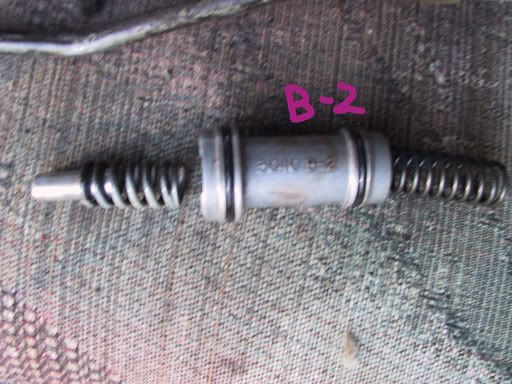
This is the first accumulator stretched out, the trick to getting them out is to push them all the way down and let them pop up... only way I can get them out.(this is the b-2 accumulator 1-2)

This is the bottom side of the accumulator(the one without the solid rod, that would be put in first going back in) This is where you want to place your shims, you want the shims to be about 1/3 of the spring travel, unless you don't care about you neck and you're tires breaking loose every shift.
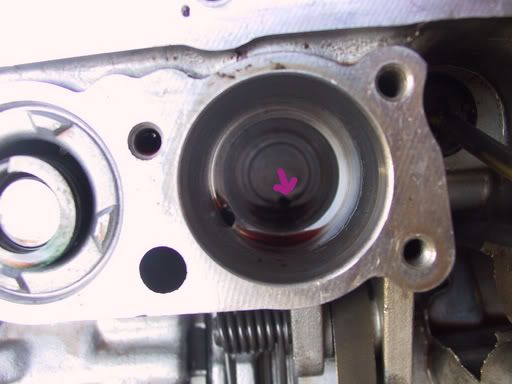
Make 100% sure that you do not block this port, if you do, you're screwed.
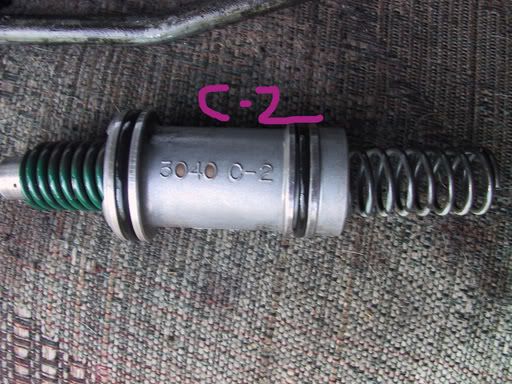
This is the c-2 accumulator 2-3 see above for details
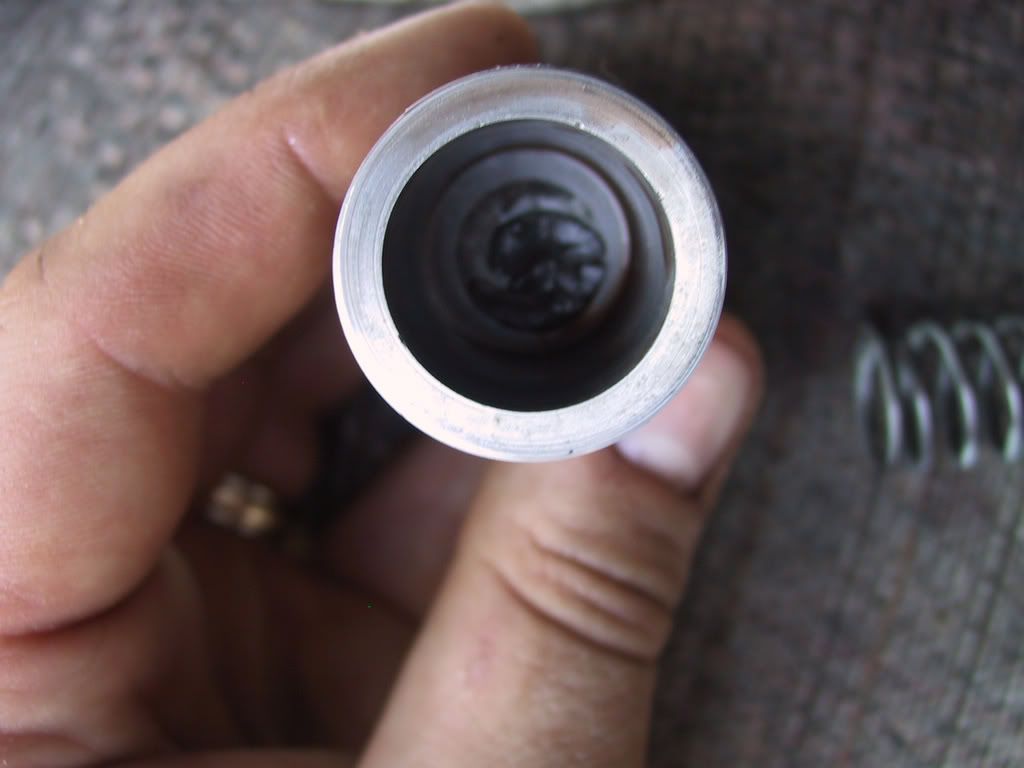
inside c-2 place shims as above
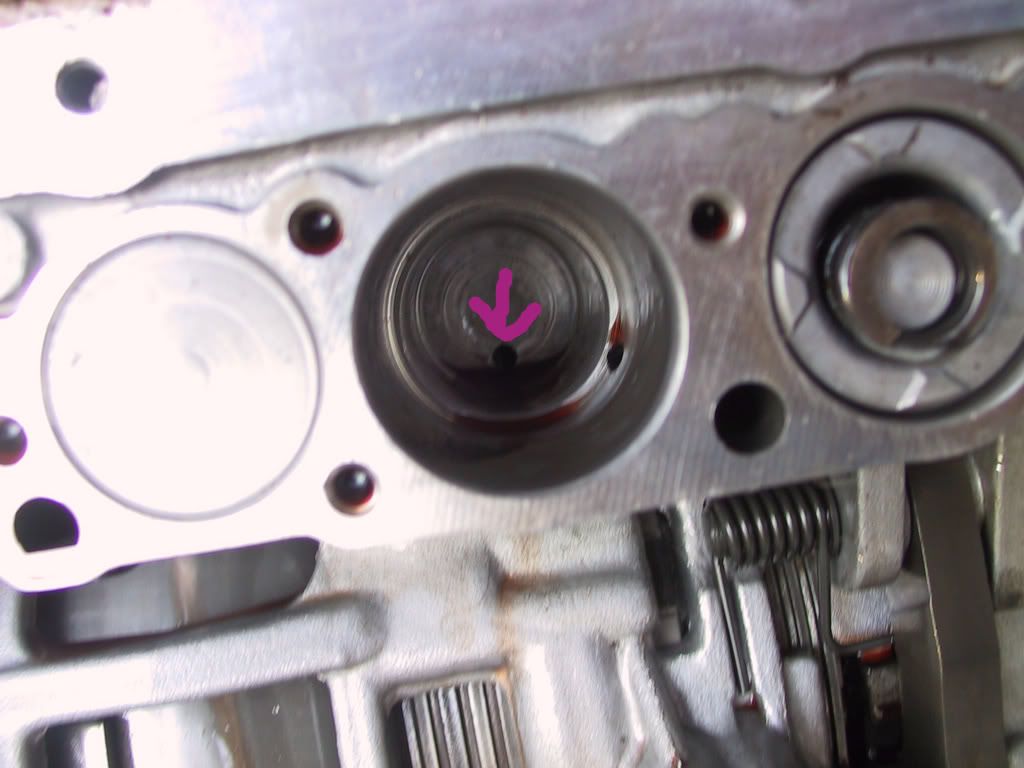
Again, don't block this port
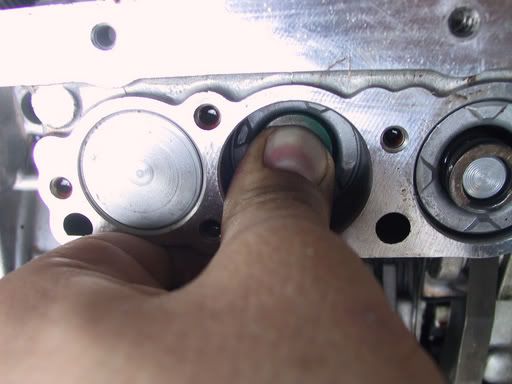
This is just a reference picture, of how far the travel is, but you'll be figuring that out on you're own.
again reference, this is the outside of the tranny, to from the right, b-2,c-2, then the kick down cable.
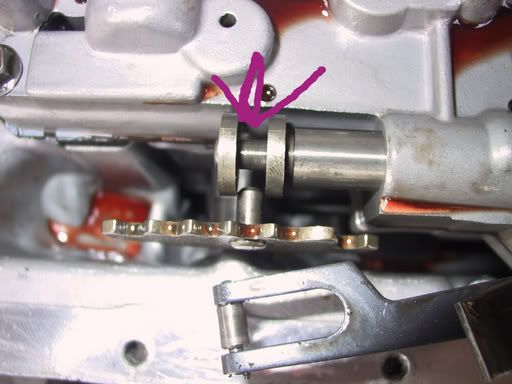
Final reference, on reassembly, make sure this is how the shift lever looks, otherwise it won't work.. =)
Final note, the easiest way of locking the kick down full open is to cut the cable(with valve body and transmission fully together) and then lock it with a cable lock or other vising device, unless you want to build a wedge to put in when the valve body is out, all a matter of preference.
Not too descriptive, but I hope this at least will give you all an idea of where to start with when upgrading a a340. Also, I don't see much need of a upgraded valve body, from what Ive researched, they are rarely more then what you can do you're self here, or slightly enlarged passages, not worth the money to me.
EDIT: Woops! deabionni beat me to it
After having one servere issue arise(we are working to correct it) I must strongly advise the following points.
1: It is best to do this mod with the transmission out of the car, the time saved by just pulling it will payoff on assembly
2: Get a new gasket, they are VERY sensitive to dust and such and can distort and bleed pressure
3: DO NOT OVER TOURQUE THE BOLTS. This is CRUICIAL you can warp the valve body or the transmission case when you do this. The spec is around INCH LBS, No airtools allowed for the valve body!
4: Do not mix your bolts up, they go in certain places.
The issue that has arrisen is a car shifting into reverse when it should go into overdrive, and it appears to be a pressure bleedoff issue, once we have that exact cause located, I will post it, and ways to avoid it.
Remove transmission(my preference)

Remove the transmission pan bolts, I marked most of them, you can figure it out...

Remove the filter with the three marked bolts. Also there are two metal tubes, I already had them out so I drew them in, gently pry back and forth and they will come out

The fun part, my recommendation is do not take the bolts out of the valve body, they are specific on their location.
Completely loosen the brown arrows, loose till there is slack on the bracket for the purple arrow, and remove electrical connectors marked by blue. Before you can remove the valve body, you must disconnect the kick down cable, see next picture to see the bottom side of it


This is what everything looks like once you get the valve body off, The two "things" marked are accumulators, those two are the only ones we are concerned with at this time

A close up of the accumulators

This is the first accumulator stretched out, the trick to getting them out is to push them all the way down and let them pop up... only way I can get them out.(this is the b-2 accumulator 1-2)

This is the bottom side of the accumulator(the one without the solid rod, that would be put in first going back in) This is where you want to place your shims, you want the shims to be about 1/3 of the spring travel, unless you don't care about you neck and you're tires breaking loose every shift.

Make 100% sure that you do not block this port, if you do, you're screwed.

This is the c-2 accumulator 2-3 see above for details

inside c-2 place shims as above

Again, don't block this port

This is just a reference picture, of how far the travel is, but you'll be figuring that out on you're own.
again reference, this is the outside of the tranny, to from the right, b-2,c-2, then the kick down cable.

Final reference, on reassembly, make sure this is how the shift lever looks, otherwise it won't work.. =)
Final note, the easiest way of locking the kick down full open is to cut the cable(with valve body and transmission fully together) and then lock it with a cable lock or other vising device, unless you want to build a wedge to put in when the valve body is out, all a matter of preference.
Not too descriptive, but I hope this at least will give you all an idea of where to start with when upgrading a a340. Also, I don't see much need of a upgraded valve body, from what Ive researched, they are rarely more then what you can do you're self here, or slightly enlarged passages, not worth the money to me.
nick can I hear your reasons for this? im curious on this subject because i have heard so many people stand on different sides on this one. I locked the cable on my old tranny when I had my NA and ran that for a long time and never had any issues with it, im about 50-50 if I want to continue doing this on my new motor and trans.Nick M;961986 said:Don't lock that cable in place though.
I havent installed my transmission yet. I did follow the mod linked but used rods that are approximatley 1/8" shorter than the springs instead of shims. Also I am not locking the line pressure cable full open this time around. I will just have it tensioned a little more at the TB. I have heard it creates more heat at lower shifting speeds when full open. Although with a proper sized tranny cooler this shouldnt be an issue. Would love to hear more arguments on it however.
i did not plan on locking mine because right now i don't have one. when they replaced the head gasket a while back b4 i bought it they forgot to put it back on. so it sat against the header and melted through. i got a brand new one just have not gotten around to putting it in.
I have done the Acc. shim thing.
It made an improvement, but still not as firm as I would like.
So now I have built another,
that I enlarged the orifices that feed the accumulators,
so that they fill quicker.
And played musical springs,
so that I ended up with more spring pressure in the accumulator circuits.
As soon as I get a higher stall converter
(I am at 3000 now, but want 4000)
it will go in the car.
Then we will see if it was a big phuch up
(if the second gear sprag blows),
or if it works........
Wish someone would just make a 100% manual valve body for
it like they doo for some of the US trans......
I know someone made a aftermarket valvebody for ours at one point, I just ran across it again not too long ago, in wasn't a 100% manual though. And I believe it was $800gofastgeorge;962406 said:Wish someone would just make a 100% manual valve body for
it like they doo for some of the US trans......
