Sup guys, I had a write up on the other forum and firgured id post it here also. if anyone has any questions about ths, please feel free to PM me. thanks.
Here is a short write up that i will edit more and more as i find my pictures, just to show the basic steps on how to get this in there (MY WAY) i know there are a few other guys out there that prefer to cut the bell housing of the gm trans and making an adapter to fit a toyota bell housing. BUT thats not how i did this. i made a plate that bolts the gm trans to our lovley 7M's to make it easier.
List of parts that i used:
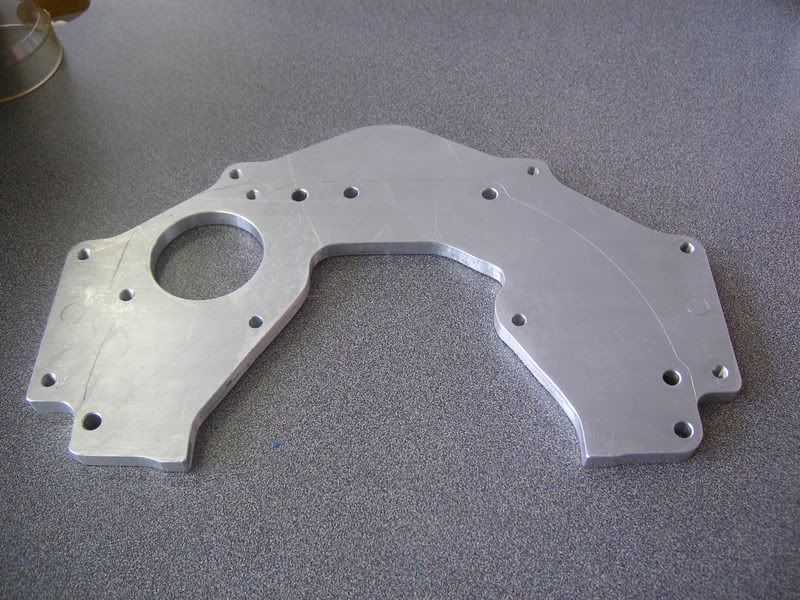
Custom aluminum adapter to mate the GM tranny (th350) to 7M Custom made by me.
Custom one peice aluminum driveshaft
TCI Gm Convertor (modified tabs to bolt to stock flywheel) also its a 4500 stall
Steel braided flexible oil dip stick for the trans for easy mounting
B&M carbon shifter/cable
Step 1 = Make the plate/ Or buy one (I will have a few for sale soon)
What i did was i helped one of my friends (who owns a custom machining shop) by bringing him a bare 7m block and the gm trans, and we worked our way from there. (the plate has holes for the dowl pins that are on the block, so when you install it, it sits nice n straight without having a hard time trying to line it up.
Step 2 = I went and used a TCI GM convertor, and modified the bottom tabes to bolt to our stock flex plate, also getting it balanced is a must if you go this route.
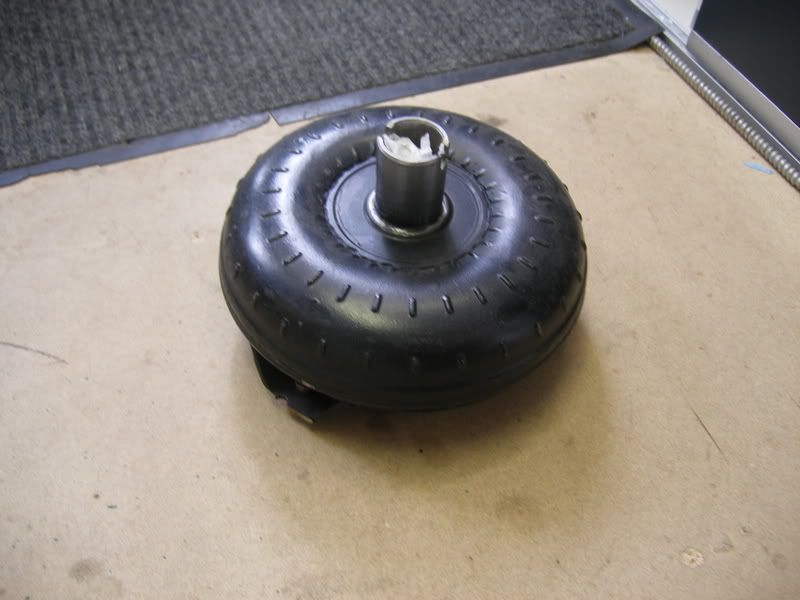
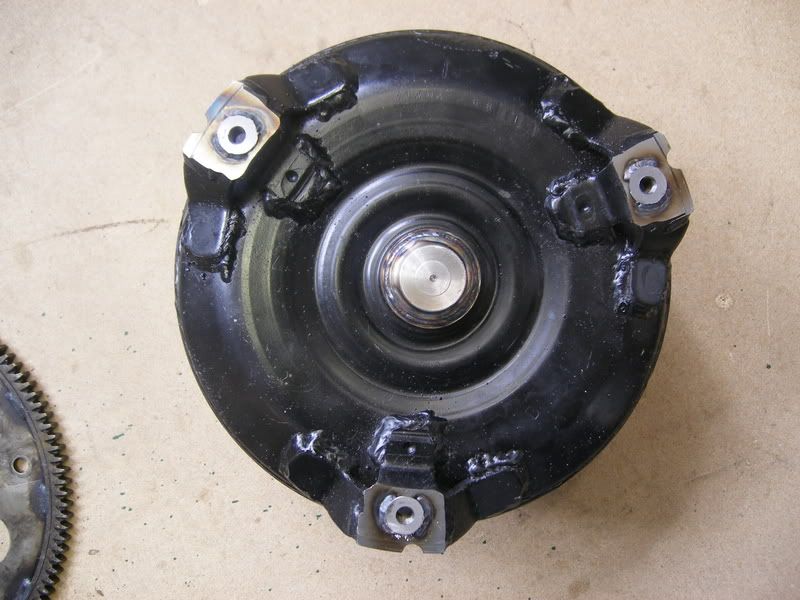
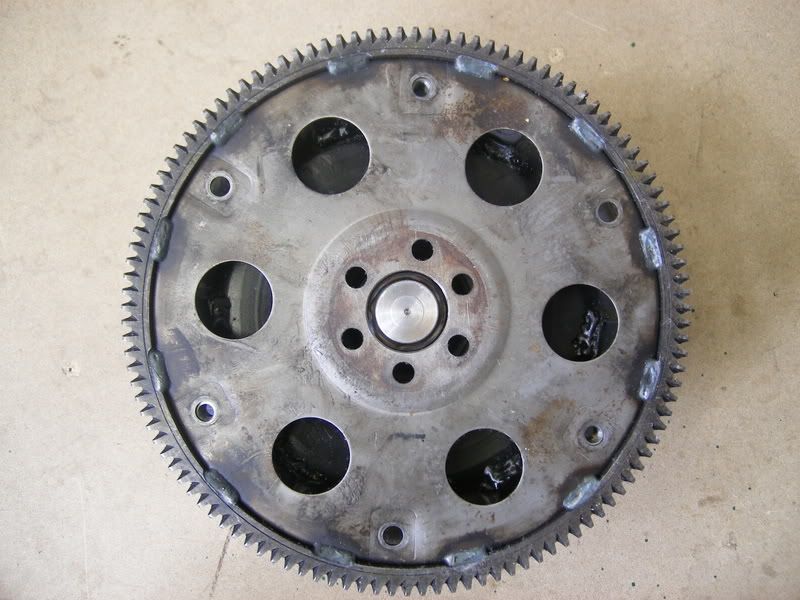
Some people would prefer to go with a hybrid convertor meaning bottom half would be toyota welded to the top half which would be a GM, either way works!
Step 3 = Bolt the convertor on to the flex plate Assuming the flex plate was left bolted on the motor, unless it was taken off then bolt the flex plate on then the convertor.
Step 4 = Slide the adapter plate behind the flex plate and bolt it to the block
Thats also when you bolt the starter to the plate. since you dont have the original bell housing that it bolts to, the plate was made for the starter to fit like stock location.
Step 5 = Line up the trans nice and tight all the way on and bolt it to your aluminum plate.
You have to cut the very top of the transmissions bellhousing to clear the water neck on the back of the head. also the side ears that stick out on the bellhousing gotta be cut also, this will take a totla of 10 mins to do with an angle cutter.
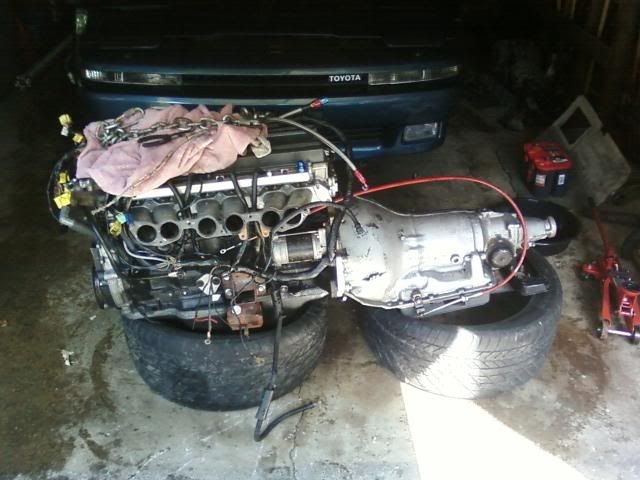
Step 6 = Pound out the tunnel with a hammer
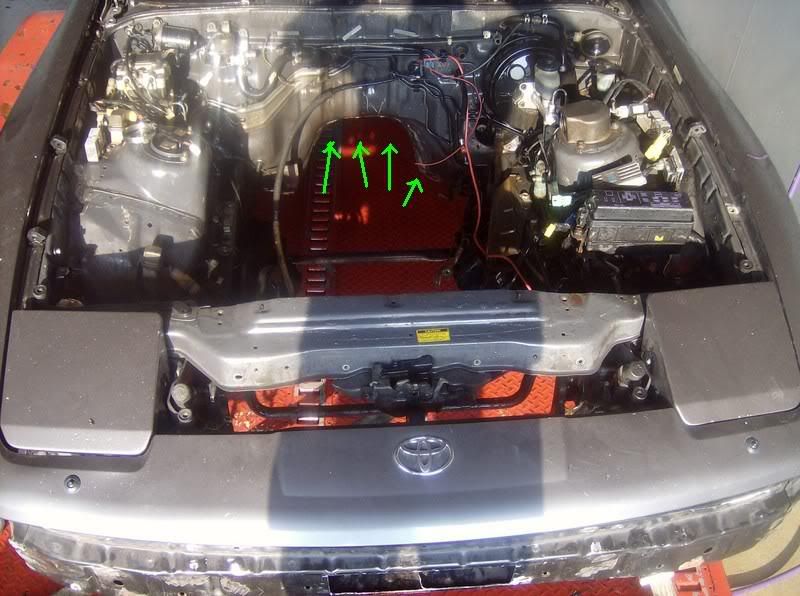
You can see the hammer marks (white) where i was pounding on the tunnel. you wanna pound out a little more on the lower driver side part also. the rest of the tunnel is big enough.
Step 7 = make a custom drive shaft.
I had a custom one peice aluminum made by shaft masters here locally, you have to measure from the center of the rear end flange to the center of the output shaft on the trans . i believe it came out to 42" on the nose but i will double check to make it easier for you guys to get one made. i had 2 different ends on the driveshaft. the original toyota flange from the stock driveshaft is what you keep and have the put on one of the ends of the new driveshaft so it bolts nicley to you rear diff.
then youl need a th350 (or whatever trans your using) yoke to go on the other end of the new driveshaft
(will get a pic as soon as i find it)
Over all picture of the drive shaft.
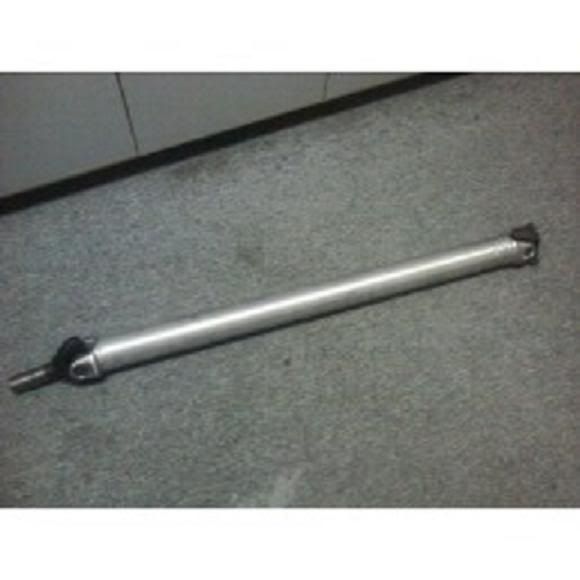
Differential end using the stock flange.

Tran end using the th350 yoke

Over all length is 43 inches on the nose.

Step 8 = Extension plate for your trans adapter.
Now when the motor is in place, youl notice that the trans adapter comes up about 4 inches short of the mounting location thats on your chassis. you have to make a plate the bolts to the bottom of the GM trans and extends out 4 inches to reach the mounting holes on the supra chassis. Once i get a original pic of it, its really easy to understand.
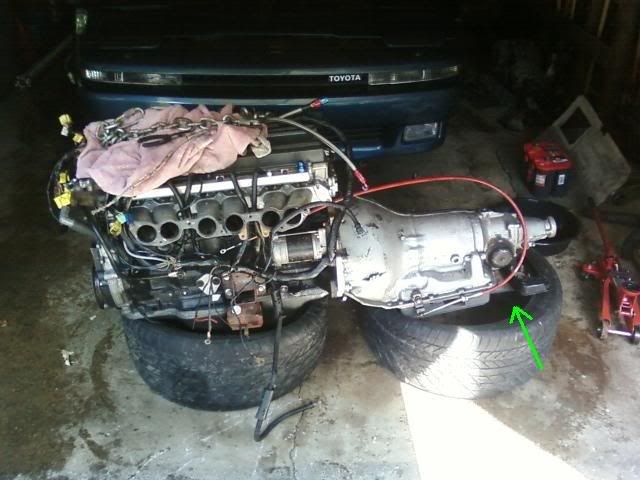
As you can see where i have a green arrow at, you can kinda see the extension plate (1/2 thick aluminum), one end bolts to the gm trans, and the other end i bolted up the stock trans mount from our 5sp trans or our autos (same bracket) and thats how the trans gets bolted up to our chassis.
Step 9 = Drop the motor/trans in but do not bolt the trans up yet as you have to install the shifter and cable first.
step 10 = Install shifter
The shifter i used was slim n long (dont get any dirty ideas here), so i just had to drill 2 extra holes for the shifter to bolt in the stock location. slide the cable through the hole in the tunnel, and u should be set.
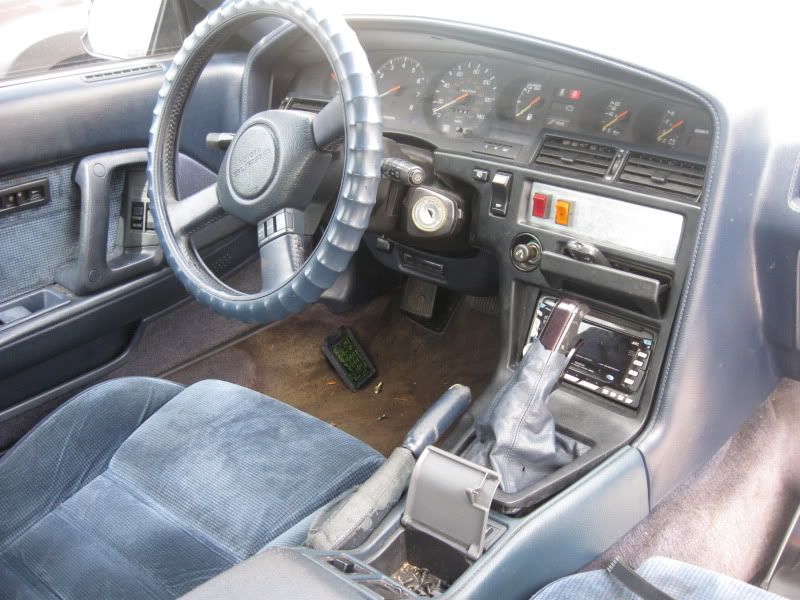
Step 11 = mount the shifter cable on to the trans and then bolt the trans up to the chassis. then you can go ahead and tighten down the motor mounts.
Step 12 = Install your new custom driveshaft in place.
Finally button up what you need to get you car running (fluids,wires,piping, fuel lines) and test it out.
This is by far the best thing you can do to a MKIII, very durable trans, nice smooth shifts and depending on what stall, it wakes the car up BIG time to give you those better launches.
Like i said this isnt the most detailed write up, but as i get my pictures in, i will explain a little more in each step so you guys can do it too.
I also make these adapter plates, PM if interested.
Here is a short write up that i will edit more and more as i find my pictures, just to show the basic steps on how to get this in there (MY WAY) i know there are a few other guys out there that prefer to cut the bell housing of the gm trans and making an adapter to fit a toyota bell housing. BUT thats not how i did this. i made a plate that bolts the gm trans to our lovley 7M's to make it easier.
List of parts that i used:
Custom aluminum adapter to mate the GM tranny (th350) to 7M Custom made by me.
Custom one peice aluminum driveshaft
TCI Gm Convertor (modified tabs to bolt to stock flywheel) also its a 4500 stall
Steel braided flexible oil dip stick for the trans for easy mounting
B&M carbon shifter/cable
Step 1 = Make the plate/ Or buy one (I will have a few for sale soon)
What i did was i helped one of my friends (who owns a custom machining shop) by bringing him a bare 7m block and the gm trans, and we worked our way from there. (the plate has holes for the dowl pins that are on the block, so when you install it, it sits nice n straight without having a hard time trying to line it up.

Step 2 = I went and used a TCI GM convertor, and modified the bottom tabes to bolt to our stock flex plate, also getting it balanced is a must if you go this route.


Some people would prefer to go with a hybrid convertor meaning bottom half would be toyota welded to the top half which would be a GM, either way works!
Step 3 = Bolt the convertor on to the flex plate Assuming the flex plate was left bolted on the motor, unless it was taken off then bolt the flex plate on then the convertor.
Step 4 = Slide the adapter plate behind the flex plate and bolt it to the block
Thats also when you bolt the starter to the plate. since you dont have the original bell housing that it bolts to, the plate was made for the starter to fit like stock location.
Step 5 = Line up the trans nice and tight all the way on and bolt it to your aluminum plate.
You have to cut the very top of the transmissions bellhousing to clear the water neck on the back of the head. also the side ears that stick out on the bellhousing gotta be cut also, this will take a totla of 10 mins to do with an angle cutter.

Step 6 = Pound out the tunnel with a hammer

You can see the hammer marks (white) where i was pounding on the tunnel. you wanna pound out a little more on the lower driver side part also. the rest of the tunnel is big enough.
Step 7 = make a custom drive shaft.
I had a custom one peice aluminum made by shaft masters here locally, you have to measure from the center of the rear end flange to the center of the output shaft on the trans . i believe it came out to 42" on the nose but i will double check to make it easier for you guys to get one made. i had 2 different ends on the driveshaft. the original toyota flange from the stock driveshaft is what you keep and have the put on one of the ends of the new driveshaft so it bolts nicley to you rear diff.
then youl need a th350 (or whatever trans your using) yoke to go on the other end of the new driveshaft
(will get a pic as soon as i find it)
Over all picture of the drive shaft.

Differential end using the stock flange.

Tran end using the th350 yoke

Over all length is 43 inches on the nose.

Step 8 = Extension plate for your trans adapter.
Now when the motor is in place, youl notice that the trans adapter comes up about 4 inches short of the mounting location thats on your chassis. you have to make a plate the bolts to the bottom of the GM trans and extends out 4 inches to reach the mounting holes on the supra chassis. Once i get a original pic of it, its really easy to understand.

As you can see where i have a green arrow at, you can kinda see the extension plate (1/2 thick aluminum), one end bolts to the gm trans, and the other end i bolted up the stock trans mount from our 5sp trans or our autos (same bracket) and thats how the trans gets bolted up to our chassis.
Step 9 = Drop the motor/trans in but do not bolt the trans up yet as you have to install the shifter and cable first.
step 10 = Install shifter
The shifter i used was slim n long (dont get any dirty ideas here), so i just had to drill 2 extra holes for the shifter to bolt in the stock location. slide the cable through the hole in the tunnel, and u should be set.

Step 11 = mount the shifter cable on to the trans and then bolt the trans up to the chassis. then you can go ahead and tighten down the motor mounts.
Step 12 = Install your new custom driveshaft in place.
Finally button up what you need to get you car running (fluids,wires,piping, fuel lines) and test it out.
This is by far the best thing you can do to a MKIII, very durable trans, nice smooth shifts and depending on what stall, it wakes the car up BIG time to give you those better launches.
Like i said this isnt the most detailed write up, but as i get my pictures in, i will explain a little more in each step so you guys can do it too.
I also make these adapter plates, PM if interested.
