Cylinder Head Preparation and Reassembly First-Timer

Zumtizzle

Can't Wait to Be King.
Oct 21, 2006
2,825
0
36
Sac-Town, NorCal
Update: NOT Going 1MM oversize!


Hey Team!

The Game Plan:

1. Finalize Hardness Testing Using My Scleroscope. (looking good so far!)
("Scleroscope" <edit IJ>)
2. Dissasemeble the Head Using The Socket Magnet Method
Send off to machine shop!
3. Have my Machinist check out the head for cracks, ect, and at the same time clean up and prep it for a MLS gasket.
3. Check Valve Guides and make sure they're at TSRM Specs and as necessary replace and have the guide posts reamed to factory clearances.
4. Have My Machinist Gasket Match Port My Head on the intake side.
5. Have the valve seats grinded and also have the valves grinded. Replace valves as necessary if they aren't straight ect.
6. Pressure Test!
Bring her home!
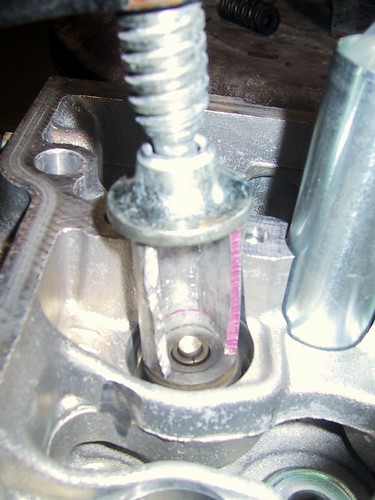
7. Using the PCV pipe tool or a valve spring compressor reassemble the head with new comp cam springs and valve seals. With Valve Grind Lube on the valve grinds and assembly lube on the valve seals.
8. Upgrade the exhaust side hardware to 7/16's studs using the driftmotion ftw kit.
9. DONE!

Any other suggestions?
Does anyone have suggestions for the valve seal pliers? I remember there was a snap on tool that was like twenty bux.

What do you guys think?!
I'm open to constructive and deconstructive criticism and don't get butt hurt like 65&#37; of you mofo's when I rain on your parades.

If you have NFI; Feel Free to Post.
Just Realize my center scroll on my mouse will work overtime.

Thanks!
Sumeet
 
Last edited:

Zumtizzle

Can't Wait to Be King.
Oct 21, 2006
2,825
0
36
Sac-Town, NorCal
IJ.;973436 said:
Only gasket match the Intake.

Buy the valve seal pliers needed they're not expensive then you have them for ever ;)

What about a polishing with a Dremel on the Exhaust side?

Got a Part Number or link for the valve seal pliers?

http://toyotool.com/valve_seal_pliers_solid_metal_co.htm

I found this.

If someone has one or something similar and wants to part with it, PM ME!

http://buy1.snapon.com/catalog/item...&group_ID=1575&store=snapon-store&dir=catalog

The Infamous MattJK used this on his 1JZ.
 
Last edited:

Zumtizzle

Can't Wait to Be King.
Oct 21, 2006
2,825
0
36
Sac-Town, NorCal
Been Contemplating, that Buddafucco. Thanks for the Input.

http://buy1.snapon.com/catalog/item...&group_ID=1578&store=snapon-store&dir=catalog
This is the tool MattJK used. But his springs had a "factory" height and comp springs won't.

Haha, Ian I edited that post.

Since the head is going to be off the car i'm going to look into the Toyota SST, but i have a good feeling that this is also a good idea.

1123021573_ac55555f06.jpg

1123017231_a9f1c1df7b.jpg


or maybe this. http://www.sears.com/shc/s/p_10153_12605_00999885000P?keyword=valve+spring
 

supraguy@aol

Well-Known Member
Dec 30, 2005
4,239
42
48
Atlanta
Sounds like you're doing almost the exact same prep job as mine.
I used the tool i post #5 on my build thread-
http://www.supramania.com/forums/showthread.php?t=47861

it was made for import and motorcycle engines. The metal tool you see is the installer. It has an adjustable depth collar, and is spring cushioned. The kit also included a valve remover, which was about the same size, but entirely made of nylon, and has a magnet embedded in its inner recess.
 

Zumtizzle

Can't Wait to Be King.
Oct 21, 2006
2,825
0
36
Sac-Town, NorCal
supraguy@aol;975330 said:
Sounds like you're doing almost the exact same prep job as mine.
I used the tool i post #5 on my build thread-
http://www.supramania.com/forums/showthread.php?t=47861

it was made for import and motorcycle engines. The metal tool you see is the installer. It has an adjustable depth collar, and is spring cushioned. The kit also included a valve remover, which was about the same size, but entirely made of nylon, and has a magnet embedded in its inner recess.

Who made it?
http://buy1.snapon.com/catalog/item...&group_ID=1578&store=snapon-store&dir=catalog
That looks pretty equivalent.

Thanks FOR CHIMING IN!

GrimJack;975315 said:

Thats Final Final Assembly But thanks for the INPUT.
 
Last edited:

supraguy@aol

Well-Known Member
Dec 30, 2005
4,239
42
48
Atlanta
suprastanger507mgte;975657 said:
man this is the only tool that you need to install and remove the valves/springs/retainers etc. Get the seal pliers as well. It shaves a lot of time and pain when assembling the head.Saved me a lot of headaches.

http://www.toyotool.com/


Yeah, the toyo tool is the one to get, not those others posted above. In fact, one of the tools you mentioned zumtizzle is actually a valve adjustment tool- meaning it's designed to allow you to chenge valve shims, not remove and install the valve spring assemblies. I would have bought the toyo tool myself, by I got my tool for a steal on Ebay a while back. I think it's made in Canada- I'll look up the instruction sheet to see.
 

Zumtizzle

Can't Wait to Be King.
Oct 21, 2006
2,825
0
36
Sac-Town, NorCal

Zumtizzle

Can't Wait to Be King.
Oct 21, 2006
2,825
0
36
Sac-Town, NorCal
supraguy@aol;975743 said:
Yeah, the toyo tool is the one to get, not those others posted above. In fact, one of the tools you mentioned zumtizzle is actually a valve adjustment tool- meaning it's designed to allow you to chenge valve shims, not remove and install the valve spring assemblies. I would have bought the toyo tool myself, by I got my tool for a steal on Ebay a while back. I think it's made in Canada- I'll look up the instruction sheet to see.

Check out Post Six. I had posted the wrong link earlier. My excuse for the redneck valve compressor is not having looked at my 7M head in months. ;)

Yea Grim Jack Posted that one. Thats FINAL FINAL and i Pref the remove the cam Method for valve clearance adjustment.

I can see i'm way overthinking this.

THANKS MOE AND SUPRAGUY!

If Anyone wants to part with their tool let me know!